A construction change order is a written amendment to the construction contract that changes the project's scope, cost, or schedule. The owner signs it before the new work begins, so everyone agrees on what's changing, what it costs, and how many days it adds.
In this guide, you'll learn what goes on a change order, how to run every change through request, pricing, and signature, and how to get the approved change onto your job schedule.
What is a construction change order?
A change order is a document used for managing change requests that go beyond the construction contract’s agreed scope of work. The general contractor generates the change order form, showing how the revised scope will affect the construction schedule and budget, and sends it to the project owner for approval before new work can begin.
The Associated General Contractors of America (AGC) describes change orders as a routine part of construction projects. In AGC's terms, a change order is an official change to the original scope or terms that the owner, contractor, and designer agree to.
Three related documents often get mixed up on the job. Each comes from a different person and does something different to the schedule:
A change order request is the contractor's or sub's proposal and pricing for work outside the contract. The schedule stays put until the owner responds.
A change order is the signed amendment. Once both sides sign, the new work, price, and dates become part of the contract.
A construction change directive is the owner's written instruction to proceed before price or time is agreed. Work starts now, and cost and days get settled under the contract's terms.
How do change orders affect construction projects?
A change order can add time, cost, and complexity to a project. Without a clear process, these changes create confusion and frustration for everyone involved, and they're one of the construction problems that add hidden costs.
Common causes of construction change orders
Construction change orders usually come from one of four causes, and each tends to land in a different phase of the job. Here's where each one typically hits and what it holds up:
Unforeseen site conditions usually surface during excavation or demo. Rock in the footing trench delays the foundation pour, and old wiring behind remodel walls adds electrical scope.
Owner-requested changes tend to arrive during framing and rough-in, while walls are still open. A new kitchen island with added circuits means more electrical work, and the rough-in inspection moves with it.
Design errors or omissions often appear once trades start installing. A beam that conflicts with a duct run stalls mechanical rough-in until the designer issues a fix.
Code or inspector requirements come up at inspections. An inspector who calls for added fire blocking sends the framer back, and insulation and drywall wait on the reinspection.
Whatever the cause, write the affected phase and the next task waiting on it into your change order's impact section.
What to include in a change order request form
Here are the key elements you’ll want to include in your change order request form.
Project and change order request details
First things first, add basic details about the project and change order so there’s no confusion about which construction project and/or customer request the change order form applies to. For example, you might include the following information on your change order form:
Project ID
Requestor name
Request date
Change order ID
Description of change
Briefly describe the customer’s request and how it differs from the original scope of work outlined in the construction contract. You want to make it easy to identify at a glance among other change orders.
Reason for change order
Explain why the customer wants to make this change. Understanding the reasons behind a change order request may prove helpful if decisions need to be made about the construction project budget or schedule.
Potential impact of change
Provide a detailed explanation of how your construction project could be affected so everyone understands the full impact of the change. Here are a few examples of potential project impacts you might include in your change order form:
Scope
Budget
Timeline
Resourcing
Communications
Other
For timeline impact, state the number of working days added or removed and which tasks or milestones move, so the owner signs off on the date change as well as the price.
Proposed action
Include as much detail as possible about any action you’ll take to execute the change order. Outline the steps required to address the change, as well as approximate hours or days needed to get the work done and any scope adjustments.
Estimated costs
Change will inevitably affect your construction budget, so estimate the financial impact to ensure it’s worth the cost. Our change order form template enables you to calculate the potential cost of materials, labor, and equipment based on your contracted rates and standard profit margin.
Markup or profit on change orders is set by your contract or company policy, so check the contract's change order clause before you price.
Change order approval
A signature is important on any construction change order because you’ve got budgets and contracts to stick to. Be sure your project owner agrees to the change approach and acknowledges the impacts and costs before proceeding.
How to manage construction change orders
Construction change management is the repeatable process for capturing, pricing, approving, scheduling, and documenting every change on a job. When every change follows that same path, owners, crews, and subs always know where it stands.
The change order process, step by step
The change order process starts the moment someone asks for something outside the contract. Work through these steps in order:
Document the change when it comes up. Take photos, save the request, note who asked, and give written notice within the window your contract sets.
Price it in the template's Bid Sheet using your contracted rates. Pulling from your saved databases keeps the numbers consistent with your other bids.
Fill out the Change Order Form, including the schedule impact in working days. List the tasks and milestones the change touches.
Get signatures before work starts. Verbal approval leaves you exposed if the owner later disputes the price or the added days.
Update the schedule and tell the affected crews and subs. The next section covers how to handle that in TeamGantt.
File the signed change order with the job and log it by number. A numbered log makes it easy to total changes at closeout or answer a billing question.
Picture the kitchen island request coming in after rough-in is scheduled. You photograph the layout, price two new circuits plus an extra electrician day, and list a 1-day impact on the form. After the owner signs, the electrician's rough-in runs a day longer, the rough-in inspection moves back a day, and drywall starts a day later.
Getting an approved change onto your schedule in TeamGantt
A signed change order protects the job only after it reaches the schedule your crews and subs work from. Until then, the electrician is still planning around the old date. In TeamGantt Builder Edition, you can make that update on the job's Gantt chart in three moves:
Save a baseline before you adjust any dates. A schedule baseline is a snapshot of the original plan, so you can show the owner exactly what the change moved.
Link the affected tasks with dependencies so you can see what the change affects. Then highlight the critical path—the chain of tasks that sets your finish date—to see whether the added day lands on it.
Request Schedule Confirmation from the subs assigned to the changed tasks. They get the new dates by email or text and confirm or decline without a TeamGantt login.
On the kitchen island job, the electrician opens the confirmation link and confirms the new rough-in date from their phone. If they decline instead, you'll know before the inspection is booked and can rework the plan while there's still time.
How to use our change order template: Basic instructions
Change is inevitable in construction project management. That’s why it’s important to establish a simple and repeatable change order process. Otherwise, frequent scope changes could result in construction delays that derail your timeline.
Our free Excel change order form template makes it easy to document changes to your construction contract. Once you set it up, you can use it to estimate and generate change orders for all your construction projects.
Our construction change order template includes the following components:
Instructions tab for help and reference
Change Order Form tab
Bid Sheet tab
3 customizable database tabs—1 each for Material, Labor, and Equipment
Review the instructions below for a quick overview of how to use the template, or watch the video tutorial below to learn how to use our construction change order template for your projects.
Step 1: Set up your Material, Labor, and Equipment databases
The first thing you’ll want to do is customize your Material, Labor, and Equipment databases by replacing the generic data we've included with data that's specific to your work. Each database tab provides instructions for how to update it, but let’s walk through the basics for each one.
Material database
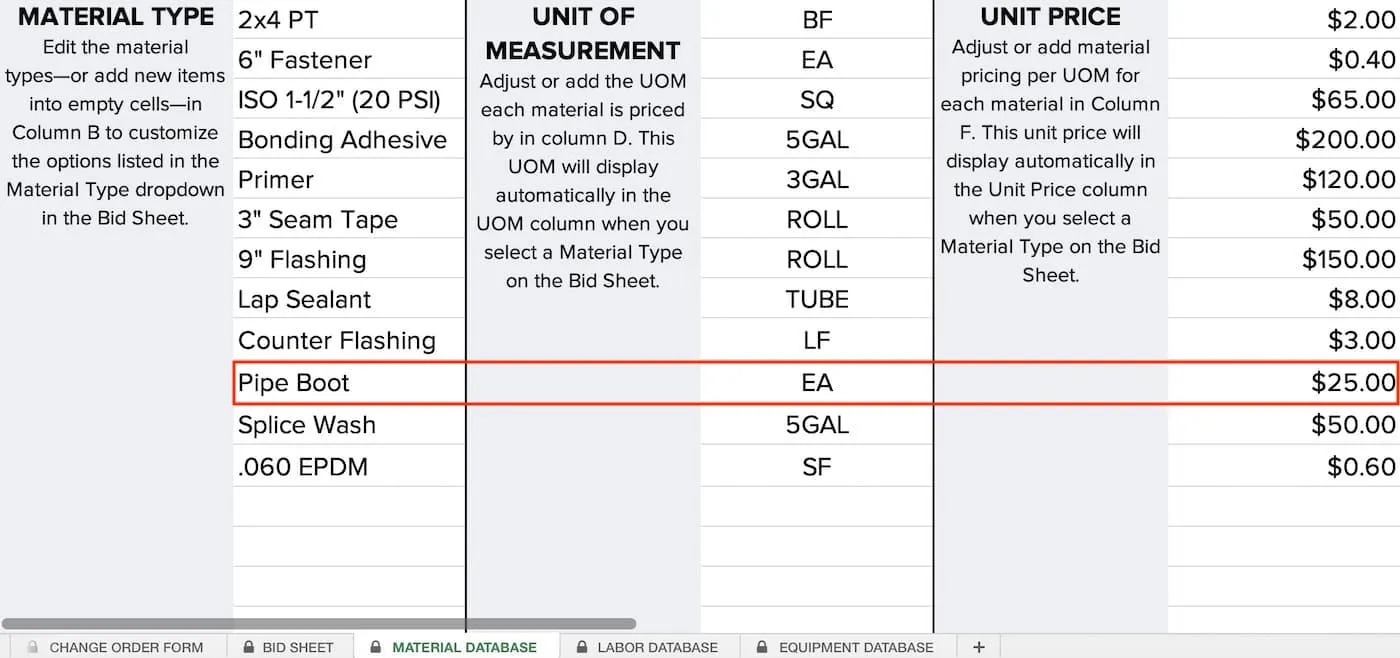
The Material database tab is where all the materials you need for a job are stored. Replace or add as many Material Types as you like in this database to ensure all the options you need are available in your Bid Sheet. Any changes you make to the columns in the Material database will be reflected in the Material section of the Bid Sheet.
When you choose a Material Type from the dropdown on the Bid Sheet, the template automatically fills in the Unit of Measurement and Unit Price based on the information you enter here. For example, if you choose “Pipe Boot” from the Material Type dropdown on the Bid Sheet, the template will instantly fill in a unit price of $25 each.
Labor database
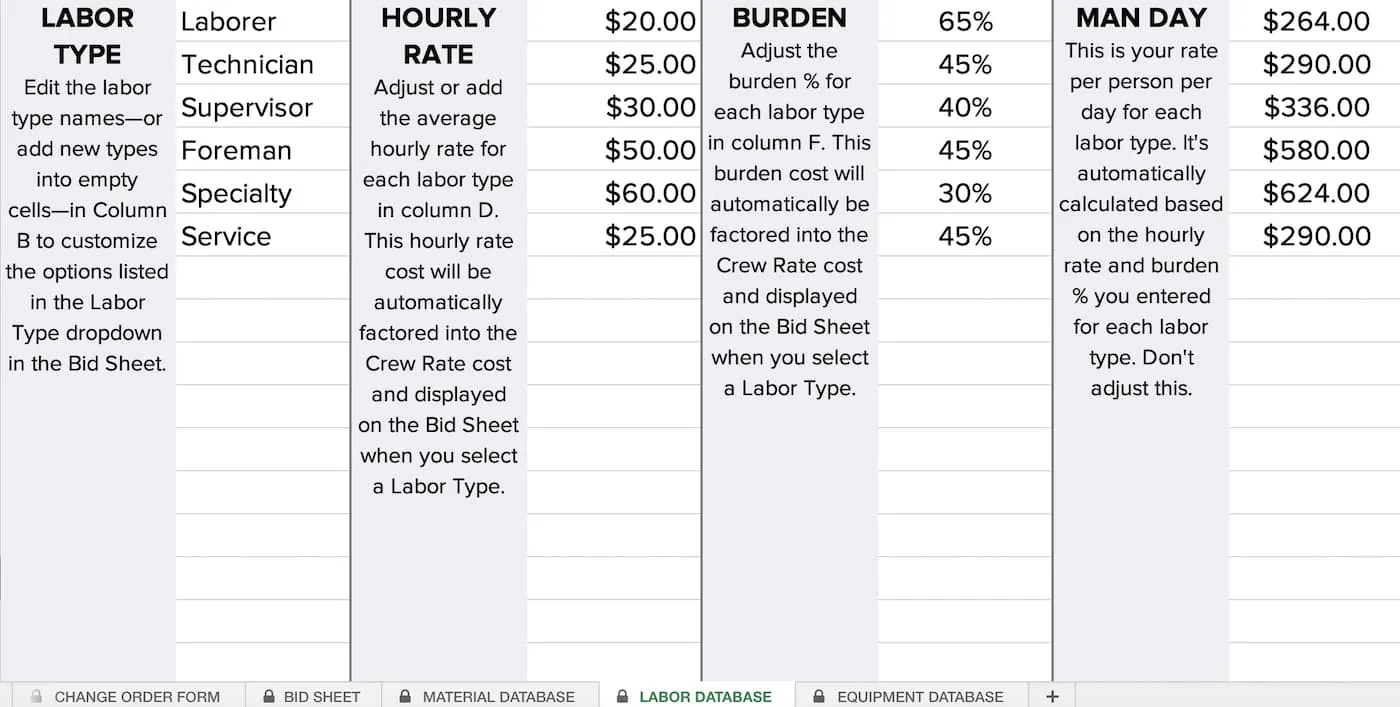
Any changes you make to the columns in the Labor database will be reflected in the Labor section of the Bid Sheet. You can add up to 24 separate Labor Types in our change order template. When you add or edit a new labor type, it will then be available from the Labor Type dropdown on the Bid Sheet.
Once you’ve listed out your labor types, enter the average Hourly Rate and Burden for each one. Labor burden is the cost you pay on top of the hourly wage, such as payroll taxes, insurance, and benefits. (Don’t want to include labor burden? Just enter 0% in this column for that labor type.)
Equipment database
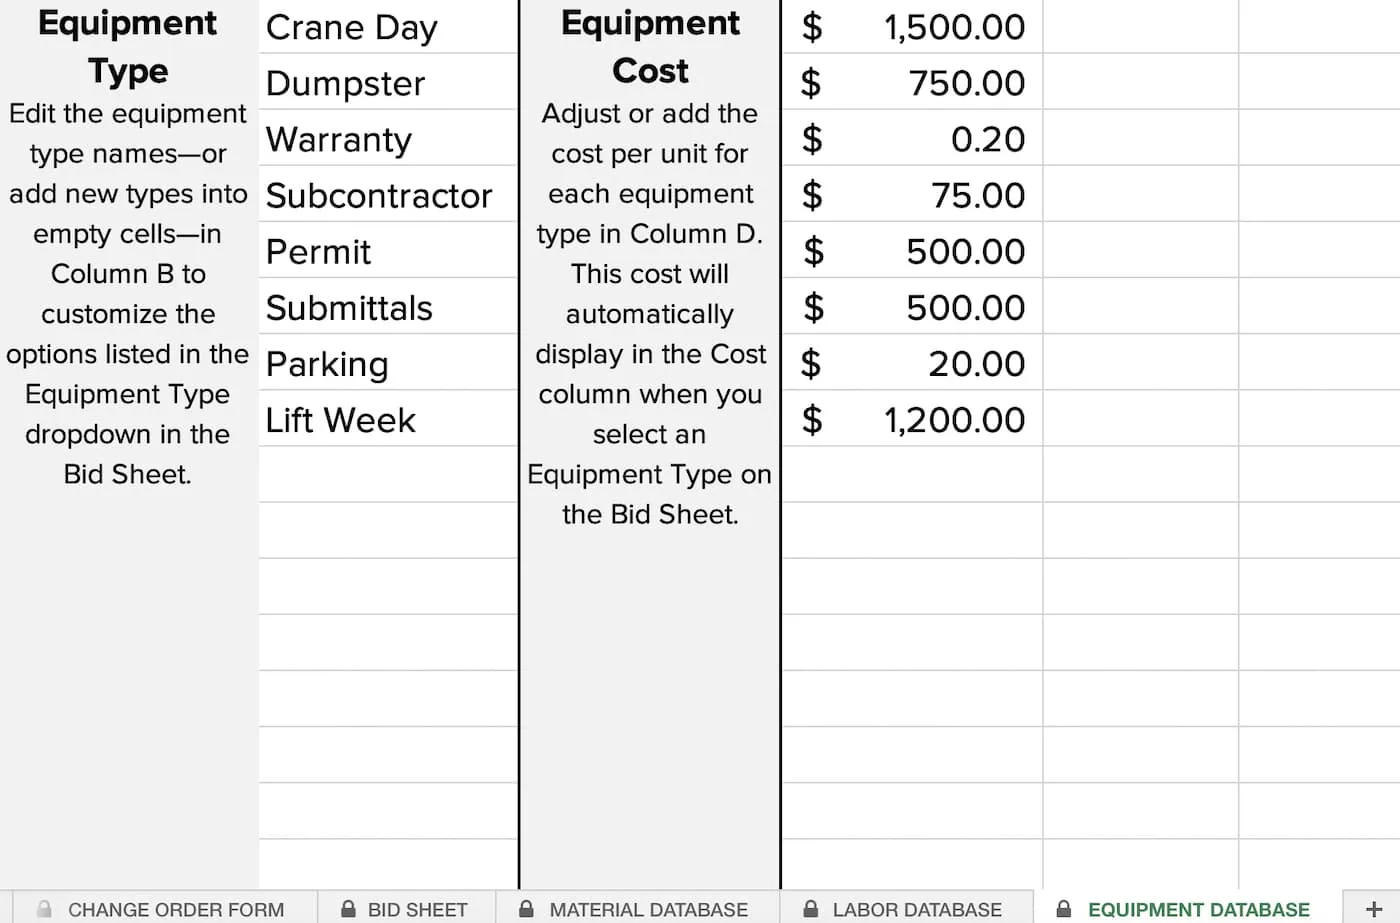
The Equipment database tab is where all the equipment you need for a job is stored. Replace or add as many Equipment Types as you like in this database to ensure all the options you need are available in your Bid Sheet. Any changes you make to the columns in the Equipment database will be reflected in the Equipment section of the Bid Sheet.
When you choose an Equipment Type from the dropdown on the Bid Sheet, the template automatically calculates the cost based on the Equipment Cost you list here, as well as the quantity entered on the Bid Sheet.
Saving your change order template for future projects
Once you’ve updated all 3 databases with your data, be sure to save it as a template. That way it will only take a few minutes to work up future change orders.
Step 2: Do your work in the Bid Sheet
Once you've set up your databases, you can begin working in the Bid Sheet. The Bid Sheet uses dropdowns that pull data from each of the 3 database tabs, helping you quickly generate your Change Order Form.
The Bid Sheet is essentially where all the work is done once you have your template set up. It’s broken down into 4 sections and you can easily see what part of the template you're working in from the labels in the left-hand column: Material, Labor, Equipment, and Summary.
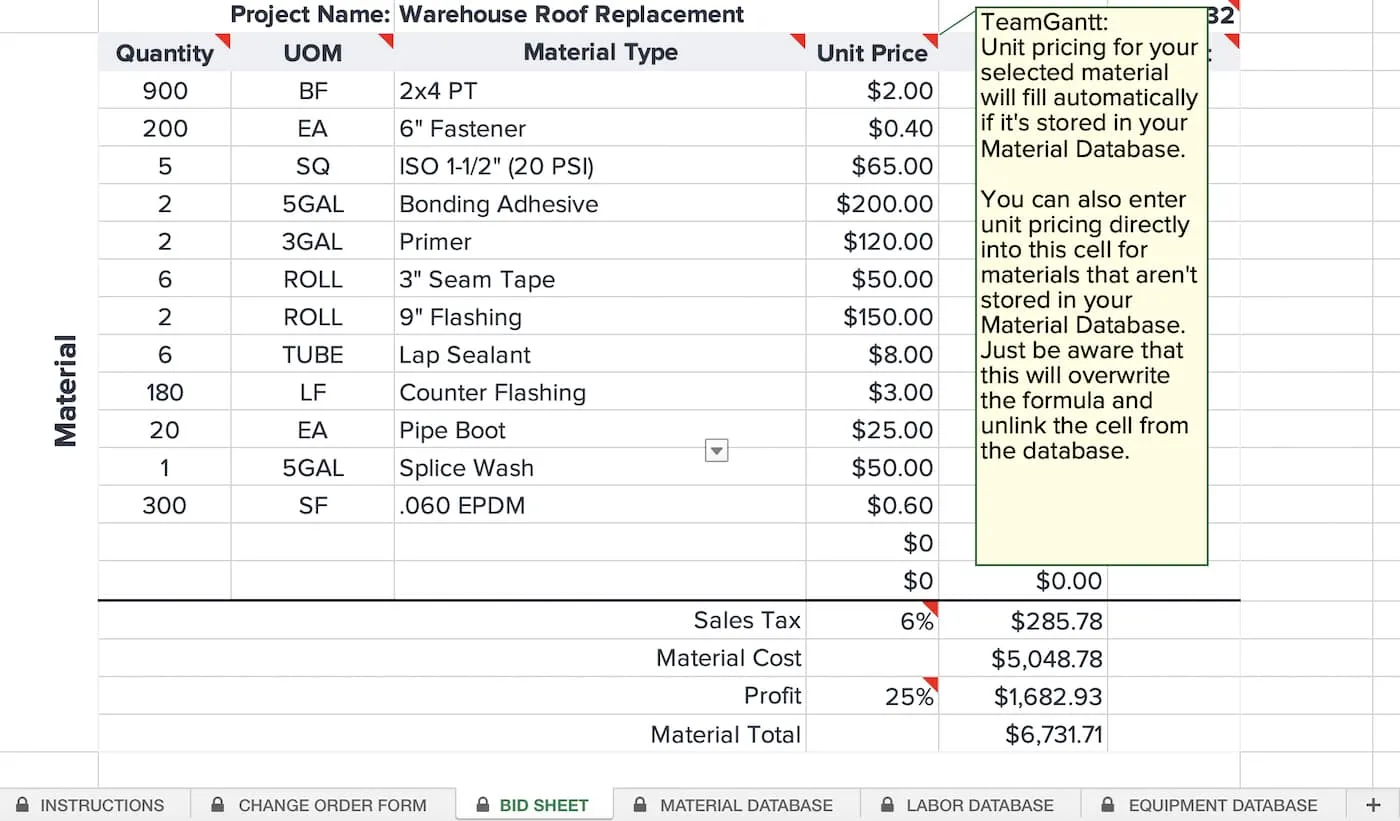
Using the Bid Sheet is fairly straightforward, but we've added reference notes to explain how each key element works. These notes are indicated by a red flag in the upper right-hand corner of the cell, as shown in the example in the template.
Project details
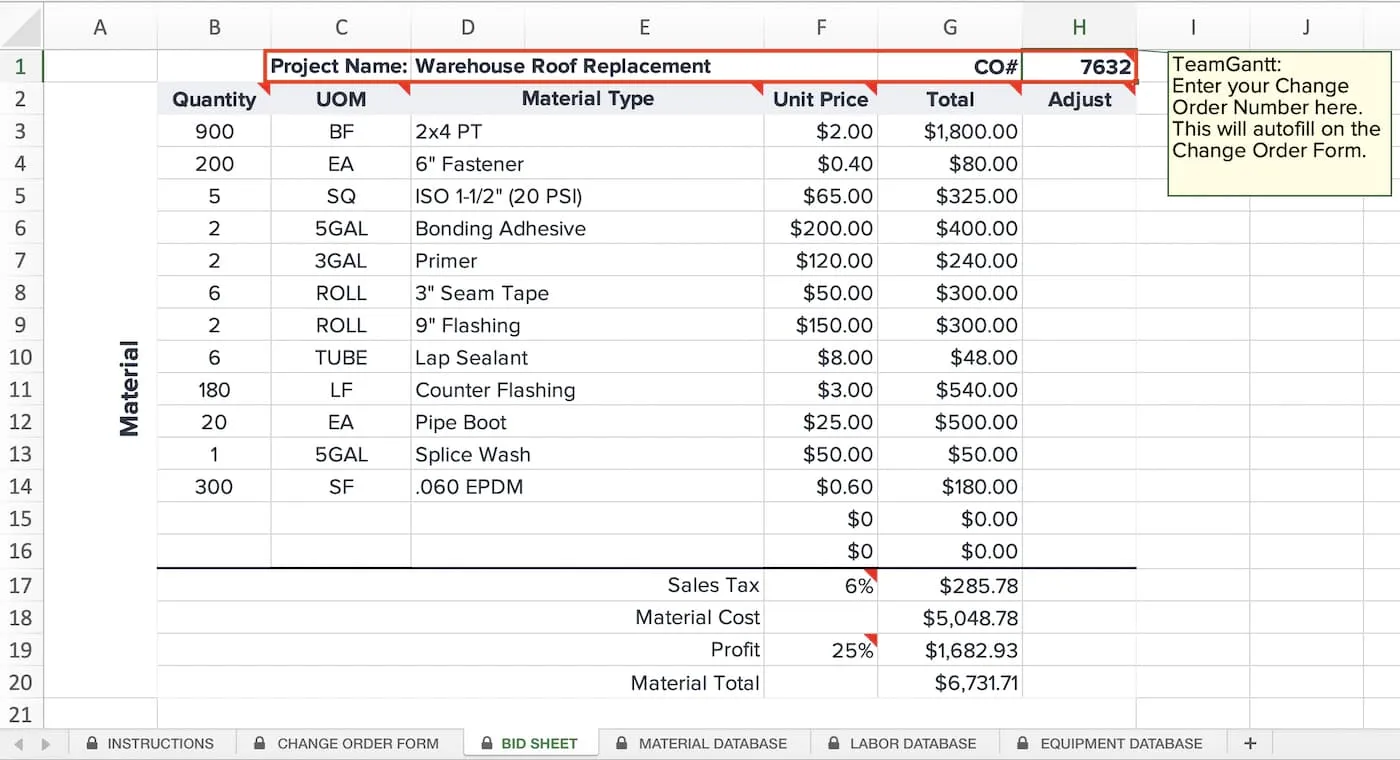
To get started, enter the Project Name and CO# (Change Order Number) at the top of the Bid Sheet. Filling this information in here automatically populates it on your Change Order Form tab too.
Material section
The Material section is where you estimate any material needed for your change order. Simply choose an item from the Material Type dropdown, and the template automatically pulls that item’s UOM and Unit Price from data stored in the Material database tab.
Once you select your material, enter the quantity needed in the Quantity column, and the template will automatically calculate the Total cost.
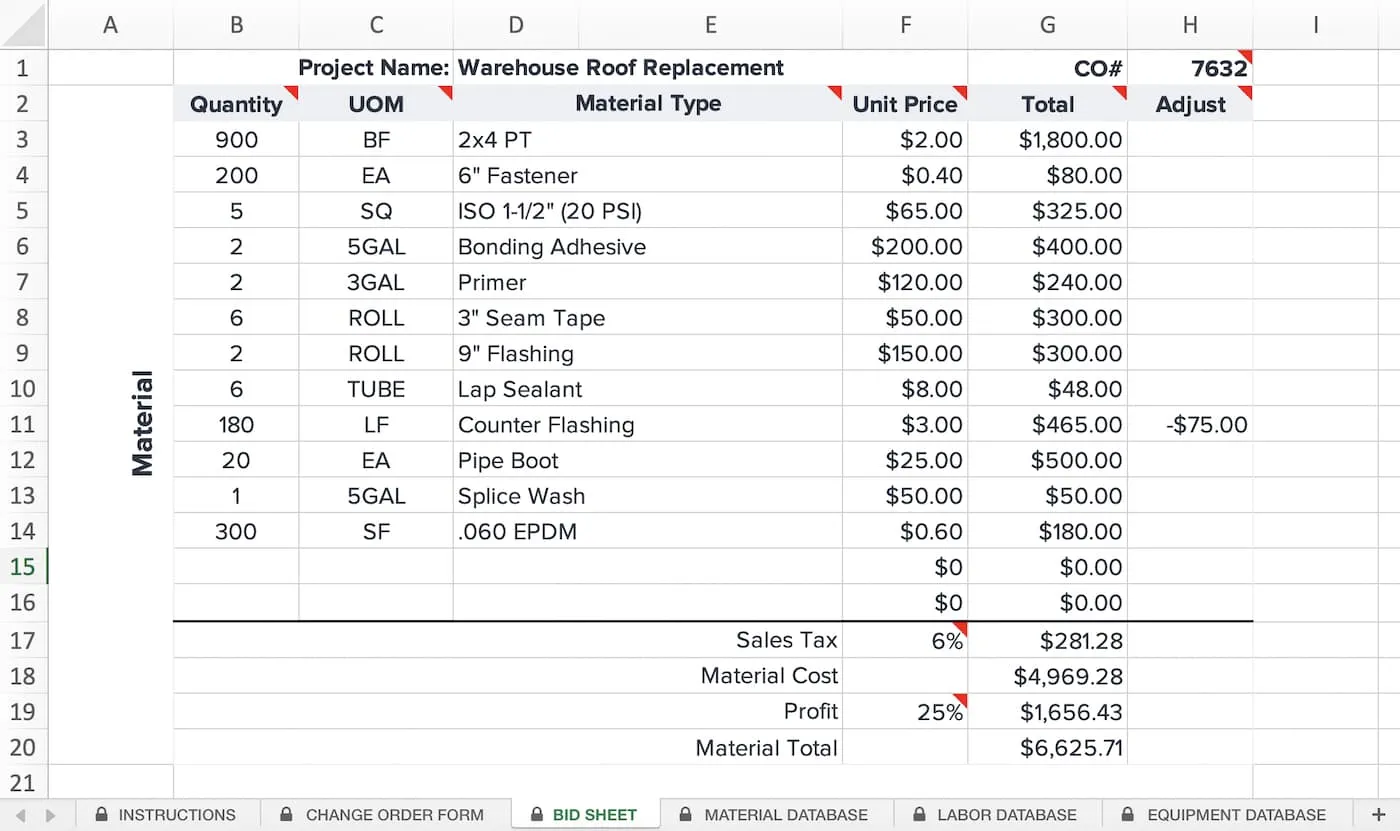
The Adjustment column enables you to manually adjust the Total cost if needed. For example, you might use it to apply a discount for a surplus product you have in stock but still want to track. Just keep in mind that the number you enter here is added to the total for that item. So if you’re entering a discount, make sure it’s a negative number.
Once you’ve completed your materials, the change order template will calculate your Material Total. Make sure to adjust the Sales Tax percentage to reflect your business’ local tax rate. For now, don’t mess with the Profit percentage. We’ll cover that in just a moment…
Labor section
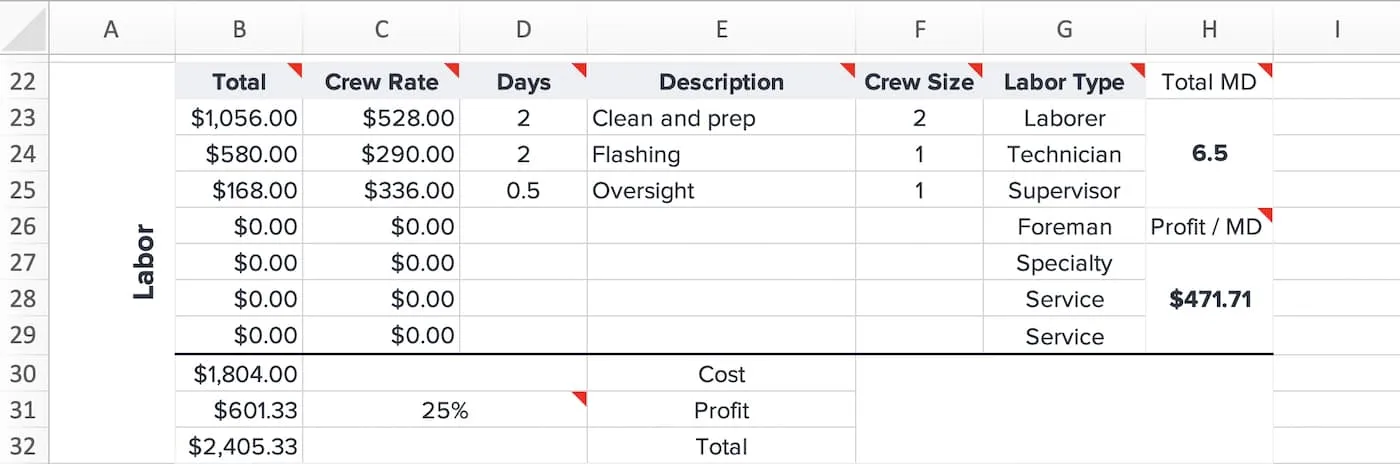
The Labor section enables you to estimate labor costs for your construction change order based on the information you enter into the Labor database tab.
Start by selecting a Labor Type from the dropdown in that column. Then enter the quantity you need for each labor type in the Crew Size column and the number of days you’ll need each crew in the Days column.
Once you’ve entered all of your labor, you’ll see it totaled below—with and without profit factored in. (Don’t adjust the Profit margin yet.) You’ll also see the Total Man Days and Profit/Man Day displayed to the right of the Labor Type column.
Equipment section
The Equipment section lets you estimate any equipment, expenses (e.g., permits, parking), resources, or additional items you want to price in the change order. Just like in the other sections, it’s pulled from the Equipment database tab.
To estimate your equipment costs, choose an equipment type from the Name dropdown, then enter the quantity of your selected equipment. The Profit and Total cells will update automatically. Once again, don’t adjust the Profit percentage just yet.

Summary section
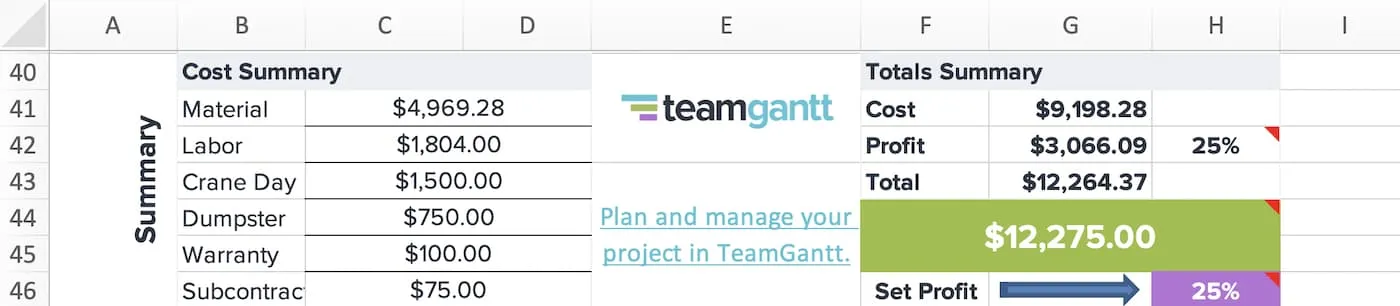
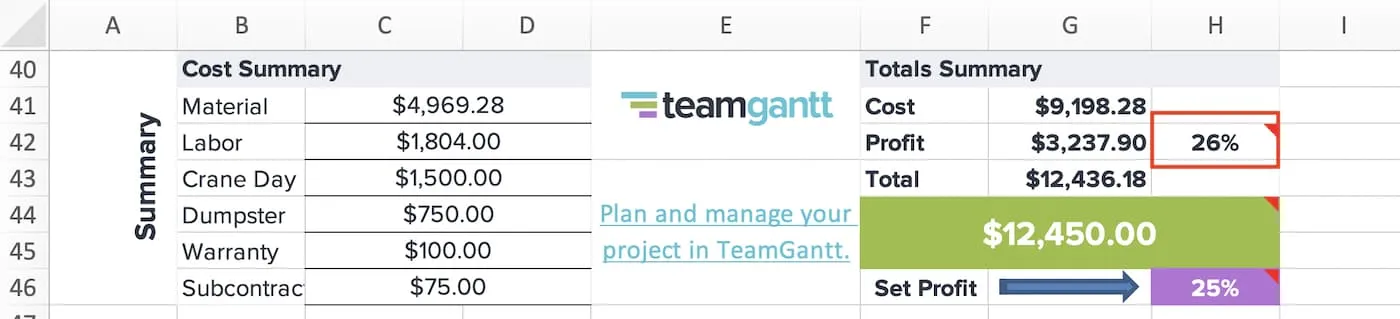
The Summary section gives you a breakdown of the following costs:
Base cost for each section of your change order
Total cost of change order without profit applied
Total profit for change order
Total cost of change order with profit applied
The big green cell displays your total rounded up to the nearest $25 increment. This cell generates the total that appears on the Change Order Form tab. Once you’re completely finished filling out your Bid Sheet, feel free to adjust the amount in this cell to the final cost you want to include on your change order form.
 Setting profit on the Bid Sheet
Now it’s time to set your profit. The purple cell at the bottom of the Bid Sheet applies a global profit margin to your entire change order. We’ve set global profit at 25% in our change order template, but feel free to adjust it to your preferred rate.
There may be times you need to set individual profit rates for material, labor, and equipment. For example, let’s say your construction project contract stipulates a 30% profit margin allowance for labor, and you need to show your work. Simply enter a new Profit percentage in the Labor section of the Bid Sheet.
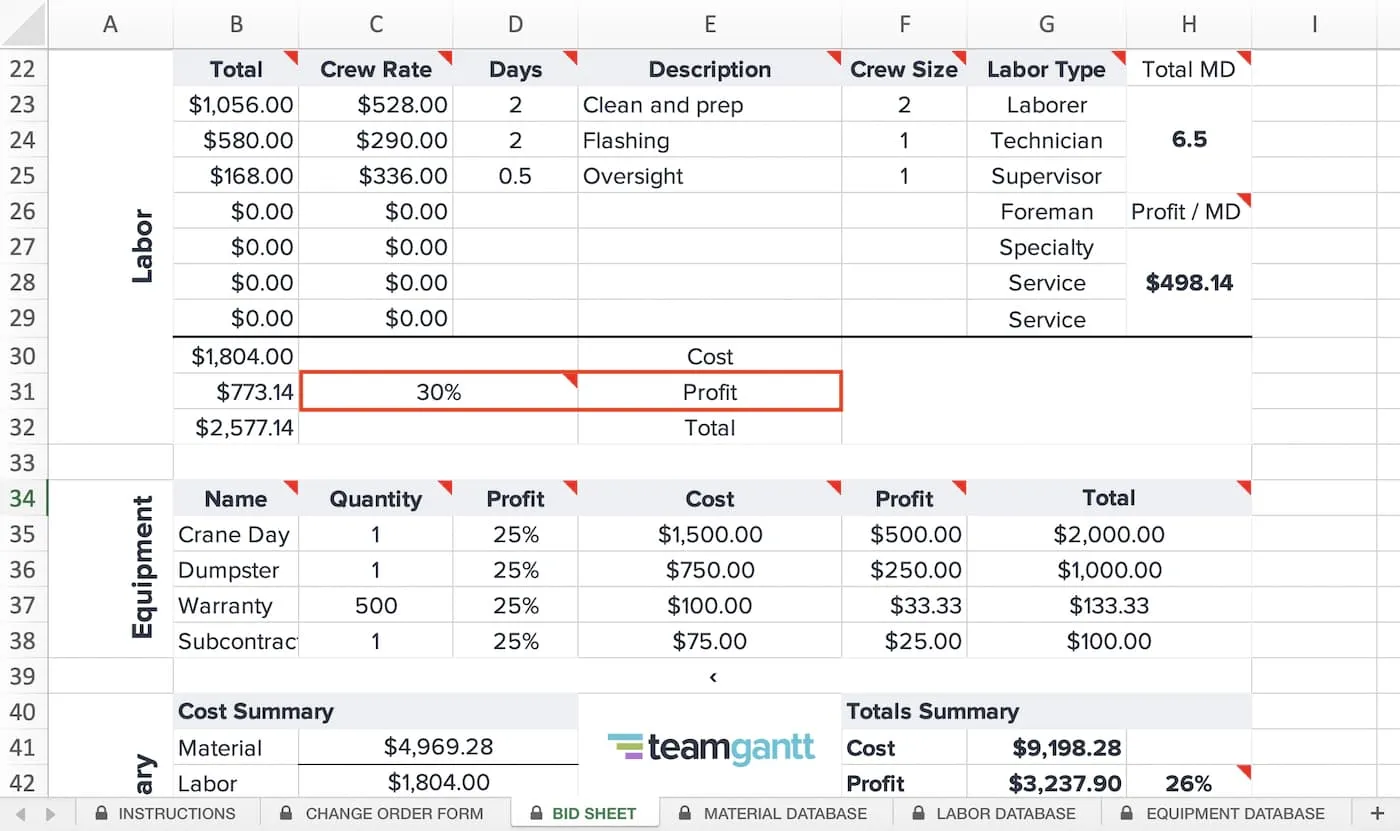
Finally, you’ll find your adjusted profit rate listed to the right of the Profit total on the Summary section of the Bid Sheet.
If your profit was set by the global profit setter, this percentage will match the rate featured in the purple cell.
If you enter any custom profit margins on the Bid Sheet, this cell will display the total profit margin for your change order after those adjustments.
Step 3: Complete the information on your Change Order Form
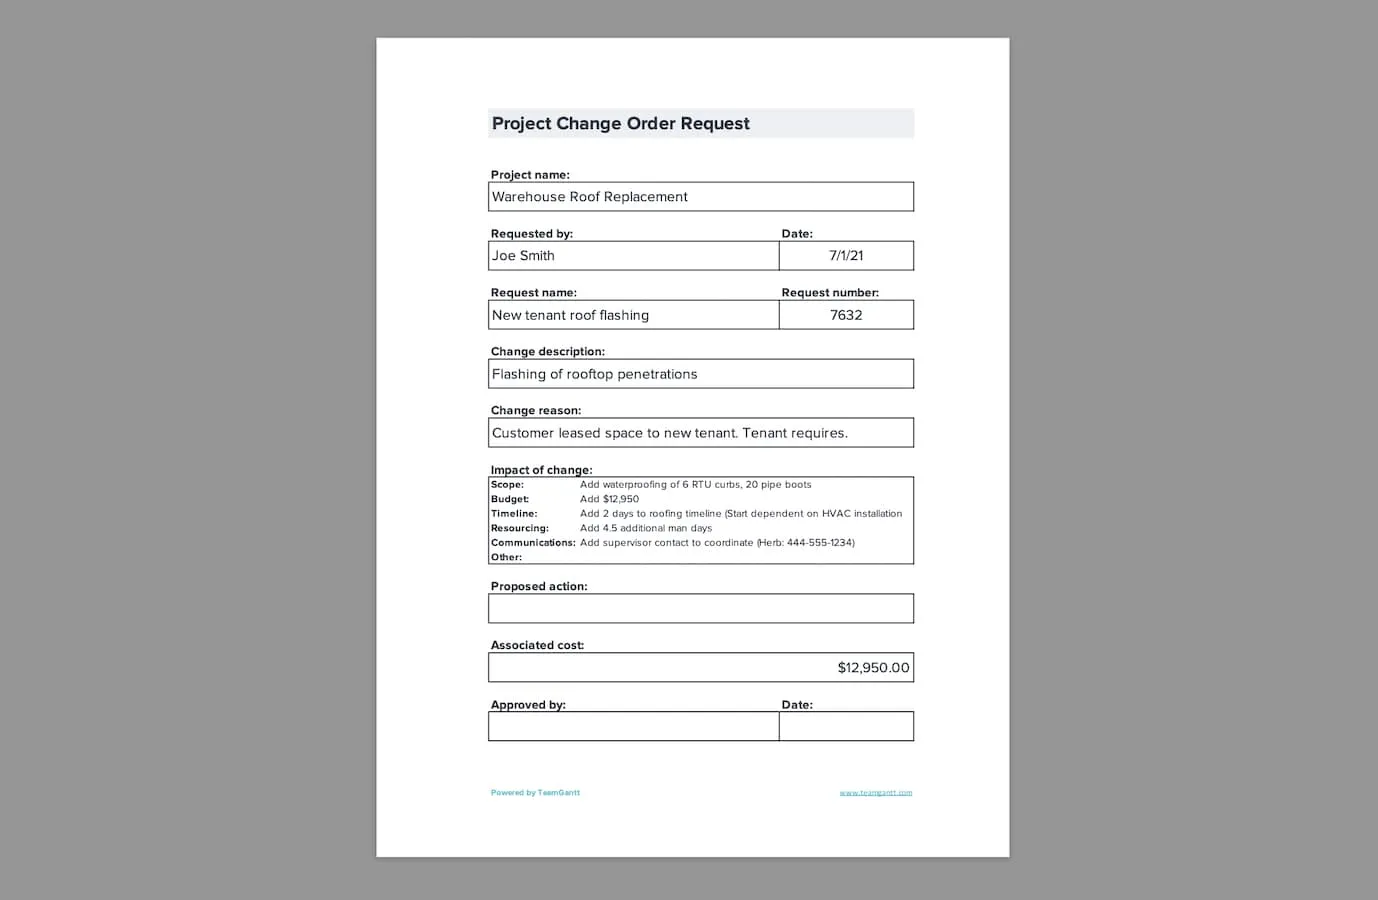
Once you've finished your work in the Bid Sheet, click on the Change Order Form tab, and fill out the free-text cells. The template will automatically populate the Project name, Request number, and Associated cost fields on the form based on the information you entered on the Bid Sheet tab.
Once you've completed the Change Order Form, print or save it as a PDF, and send your change order out!
Important notes about using our construction change order template
For the most part, this change order spreadsheet is protected to prevent accidentally deleting a formula. However, a few cells in the Bid Sheet that contain formulas are unprotected to give you flexibility where you need it.
If you attempt to enter data in an unprotected cell that contains a formula, you'll get an alert warning you about changes that will happen if you proceed. Then you'll be given the choice to continue or cancel your entry. If you continue, the formula will be overwritten.
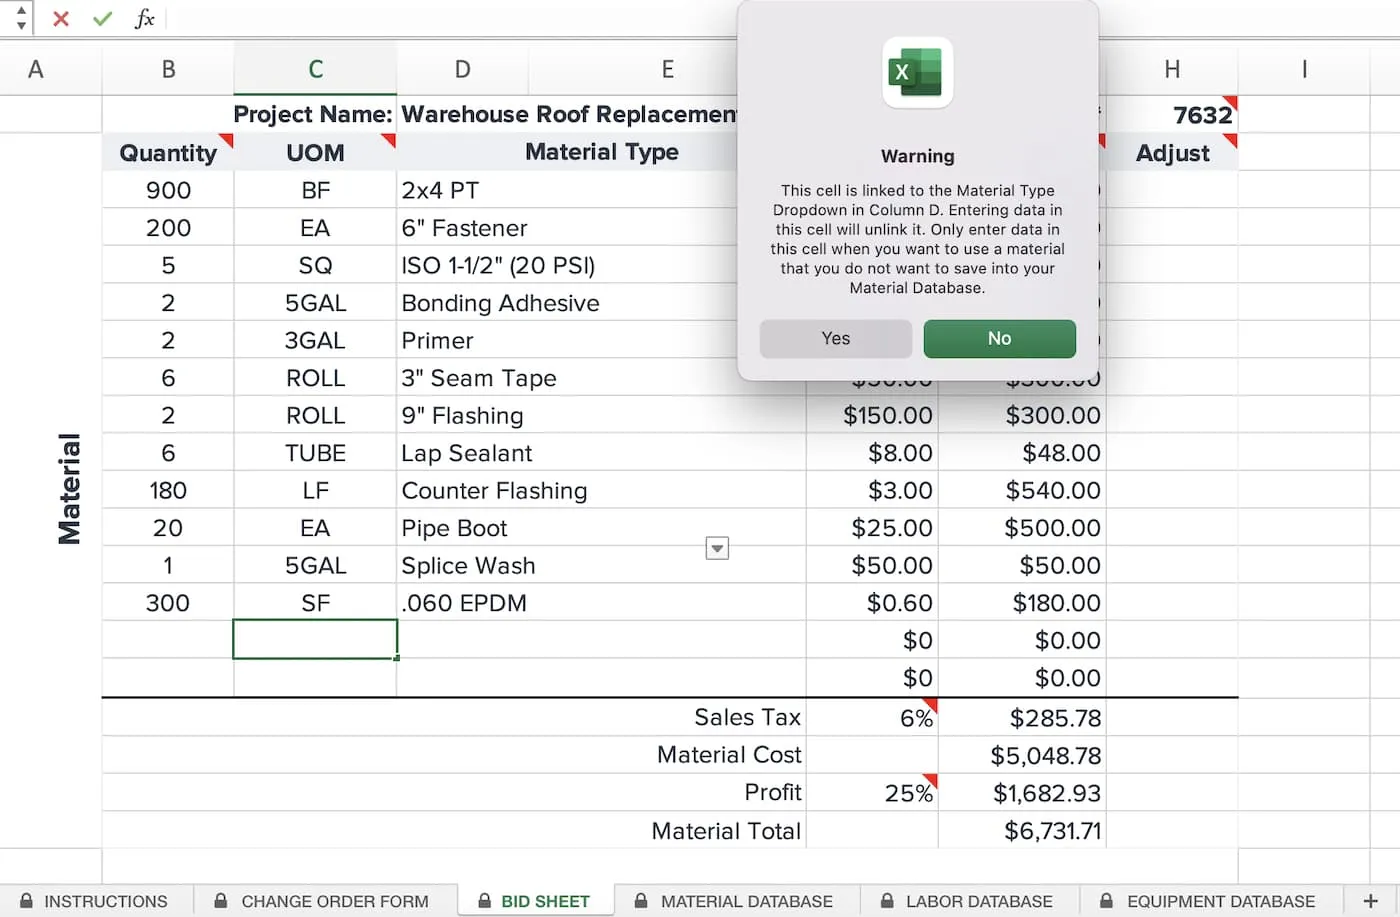
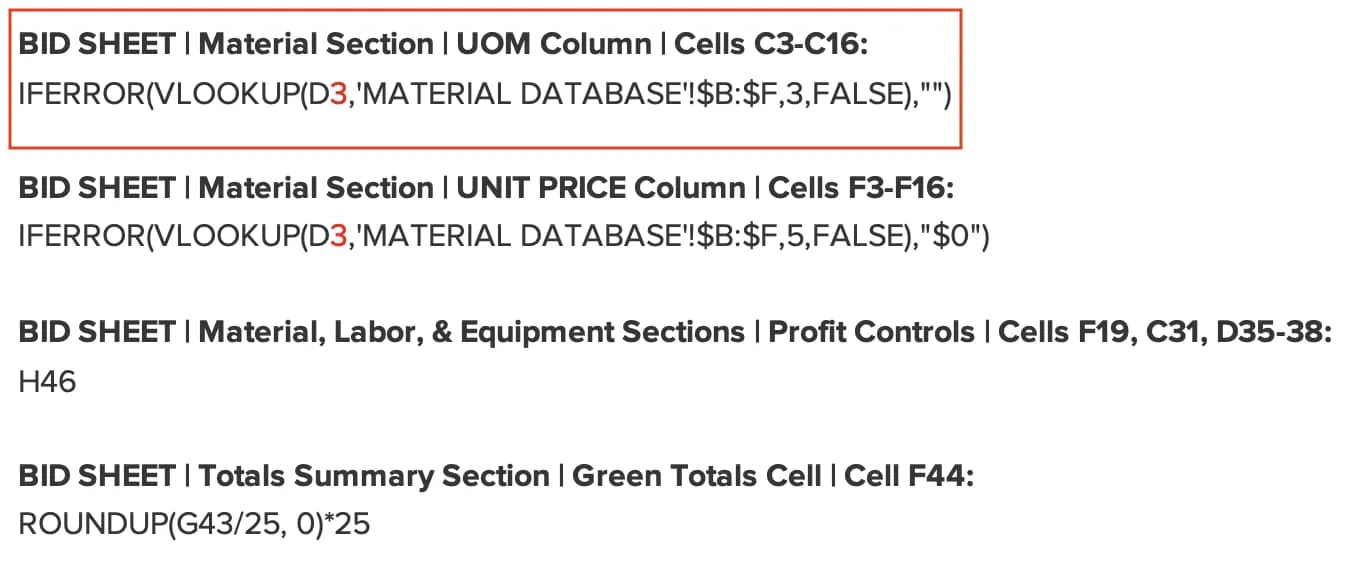
If you accidentally overwrite a formula in an unprotected cell on the Bid Sheet, don't worry. We've listed them for you on the Instructions tab of the change order template. Simply copy the formula you need, paste it into the cell that was overwritten, and then add the = symbol at the beginning of the formula.
Some of the formulas listed on the Instructions tab of the change order template include red numbers. This indicates a formula that applies to all the cells in a particular column range. If you copy/paste one of these formulas into the Bid Sheet, be sure the red number matches the row number of the cell you paste the formula into.
For example, the first formula listed below contains a red 3. If you were to paste this formula into the C4 cell on the Bid Sheet, you'd need to update the 3 to a 4 since C4 is located in the 4th row on the Bid Sheet. For C5, you'd update the 3 to a 5, and so on.
Change order best practices
Change orders hold up best when you handle every one the same way, on every job. These habits keep pricing consistent and disputes rare:
Get every change in writing and signed before the work starts, including small ones the owner mentions on a site walk.
Number change orders sequentially and keep a running log in the job file.
Describe the change specifically enough that someone outside the job could understand it a year from now.
Price from your saved Material, Labor, and Equipment databases so every bid uses current rates.
State the schedule impact in working days, even when it's zero.
Review the contract's change order clause at kickoff, including the notice window, markup, and who signs.
Use the same template on every job so owners and subs know what to expect.
Share and manage construction change orders with TeamGantt
Download our free change order form template to estimate and generate change orders for your construction projects.
When you're ready to manage change across the whole job, TeamGantt's construction scheduling software keeps the plan, the schedule, and every approved change in one place. Start from our free construction master schedule template.
Here are a few ways you can use TeamGantt to manage change on your construction projects:
Upload signed change order documents and store them in one place everyone can access
Turn proposed actions into tasks so you can set deadlines and track progress along the way
Supers and subcontractors can access change order documents and update task progress on and off the jobsite with TeamGantt's mobile app.