Managing multiple jobs and feeling the chaos? See a simpler way to stay in control—without bloated enterprise software.
Get a personalized demo →
As a project manager, a huge part of your role is to write project plans that help you keep projects on track. But that’s not all a project plan should do.
A project plan is arguably the most important document you’ll create for a project. At its core, a plan should communicate your project approach and the process your team will use to manage the project according to scope.
Let’s take a closer look at how you can develop a rock-solid planning process that guides your team and projects to success.
A project plan is a document that maps out the tasks, effort, timing, and resources needed to meet project goals within a predefined scope. It’s often presented in the form of a gantt chart because it’s easy to visualize the project timeline and ensure work stays on track.
Any solid project management plan should answer the following questions:
A project plan communicates this information in a simple, straightforward way so everyone clearly understands the objectives and how they contribute to project success. It may also be accompanied by other planning documents, such as a project charter, risk assessment, or communication plan.
While no two project plans are alike, they all share the same common building blocks. Be sure to include the following components in any project plan you create:
Here’s a simple example of what a project plan looks like with these basic elements highlighted:

Some people don’t understand the power of a good project plan. If you feel pressured to skip the plan and jump right into the work, remind your team and stakeholders that having a plan benefits everyone by making it easier to:
Easy drag and drop features with templates for faster scheduling. Plan a project in minutes, collaborate easily as a team, and switch to calendar and list views in a single click.
Create your free plan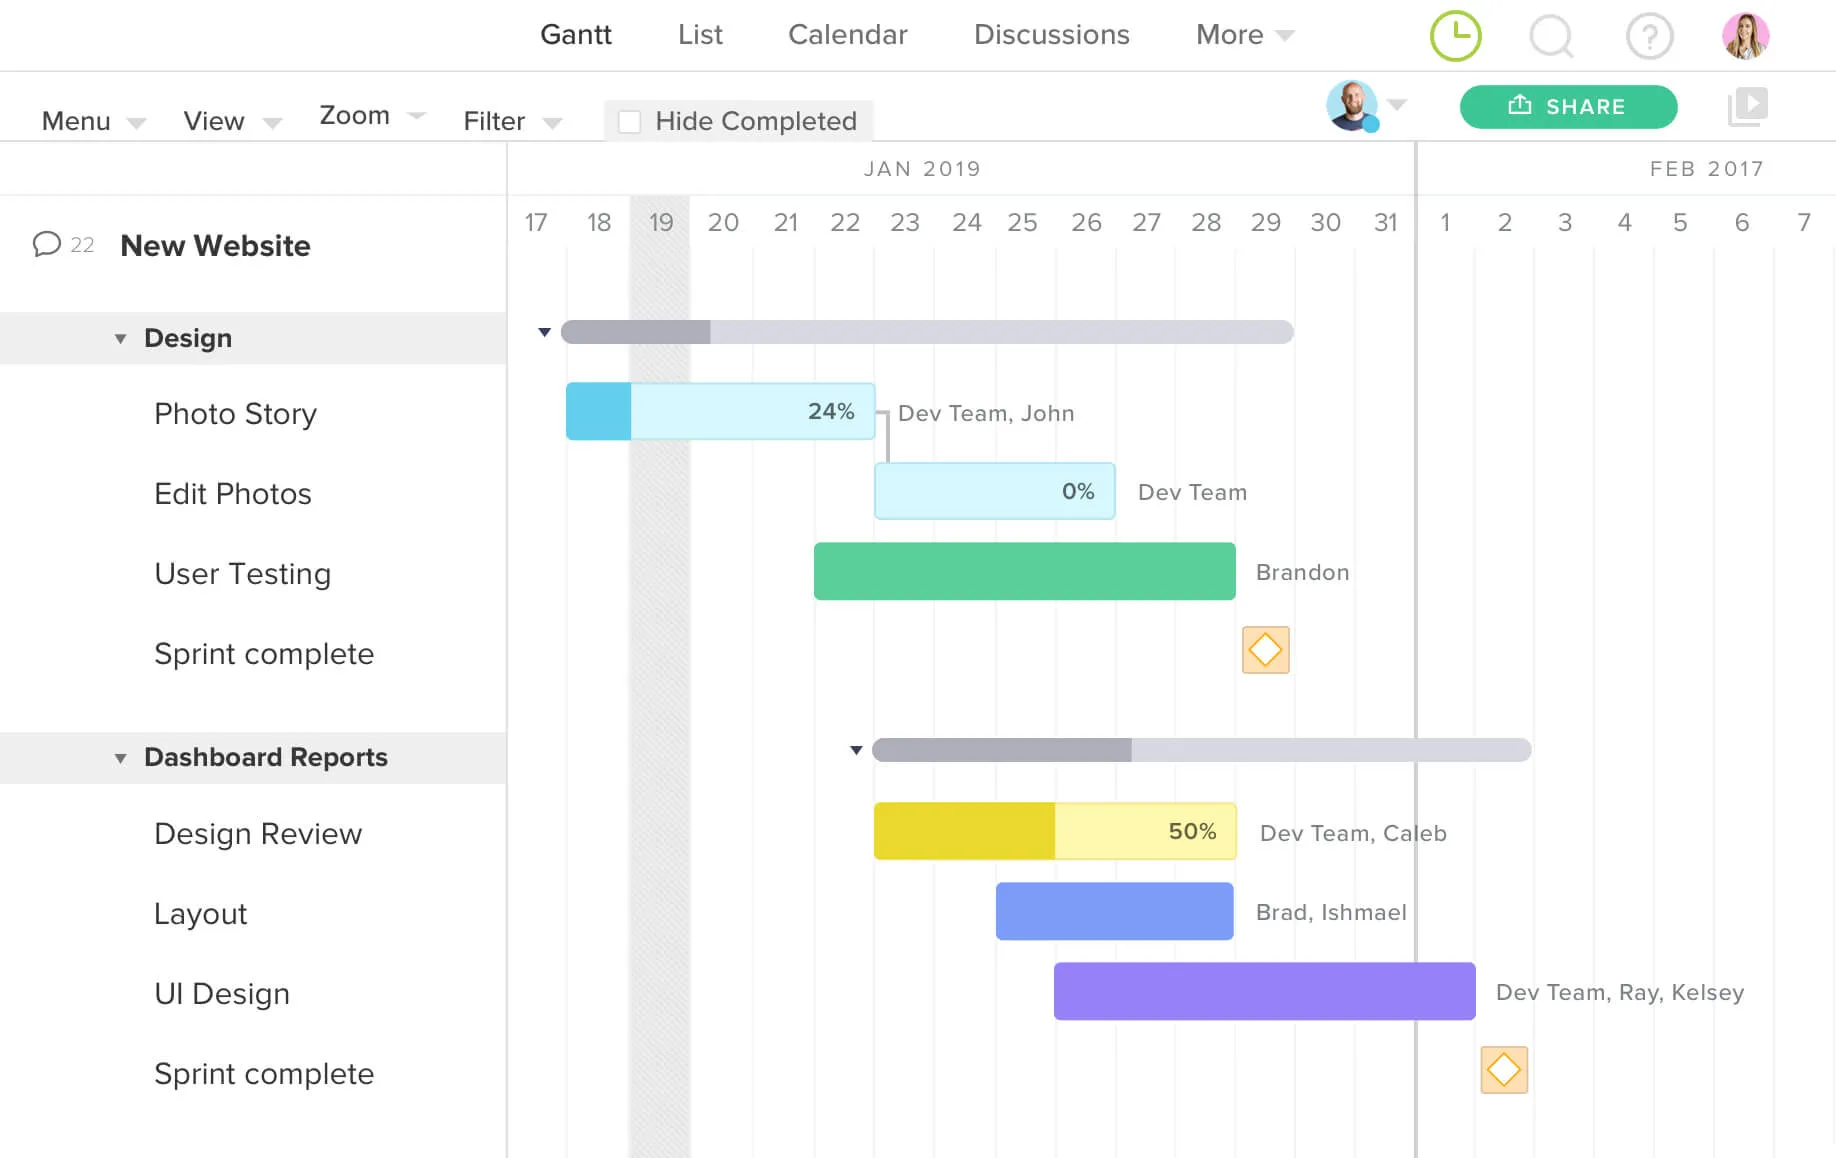
Poor planning can lead to some pretty ugly consequences—from missed deadlines and budget overages to team burnout and client frustration. That’s why it’s important to establish a solid process you can use to plan any project.
Planning a project doesn’t have to be difficult. These basic project planning steps can help you write a plan that’s both realistic and on target.

A project plan is more than a dry document with dates. It’s the story of your project, and you don’t want it to be a tall tale! So make sure you know all the facts before you start creating a project plan.
Understanding the ins and outs of the project will help you determine the best process and identify any snags that might get in the way of success. Conduct your own research to dig deeper on:
Review the scope of work, and dive into any documents or communications relevant to the project (maybe an RFP or notes from sales calls or client meetings). Be thorough in your research to uncover critical project details, and ask thoughtful questions before you commit to anything.
If you want to dazzle stakeholders with a stellar project delivery, you’ve got to know how they work and what they expect. Schedule time with your main project contact, and ask them some tough questions about process, organizational politics, and general risks before creating a project plan.
This will give project stakeholders confidence that your team has the experience to handle any difficult personality or situation. It also shows you care about the success of the project from the start.
Be sure to discuss these things with your stakeholders:
See a list of sample interview questions to ask stakeholders so you can develop better project plans.
The last step in the research phase is to take time to learn more about the people who’ll be responsible for the work. Sit down with your team and get to know their:
Understanding these basics about your team will help you craft a thoughtful plan that takes their work styles and bandwidth into consideration. After all, a happy team delivers better projects.
Now that you’ve gathered the basic project details, the next step is to knock out a rough draft of your plan. Take some time to think about the discussions you had in the pre-planning phase and the approach your team might take to meet the project goals.
Sit down with a pen and paper (or a whiteboard), and outline how the project should work at a high level. Be sure you have a calendar close by to check dates.
If you’re at a loss for where to begin, start with the who, what, when, and how of the project. A first outline can be very rough and might look something like a work breakdown structure. Make sure your project outline includes the following components:
Considering these elements will help you avoid surprises—or at least minimize them. And remember, you’re doing this as a draft so you can use it as a conversation-starter for your team. It’s not final yet!
You don’t want to put yourself or your team in an awkward position by not coming to a consensus on the approach before presenting it to your client. That's why a project manager can’t be the only one writing a project plan.
Once you’ve created a basic project outline, take those rough ideas and considerations to your team. This enables you to invite discussion about what might work rather than simply dictating a process. After all, every project must begin with clear communication of the project goals and the effort required to meet them.
Be sure to get input from your team on how they can complete the tasks at hand without killing the budget and the team’s morale. As a project manager, you can decide on Agile vs. Waterfall approaches, but when it comes down to it, you need to know that the team can realistically execute the plan.
You can also use this review time to question your own thinking and push the team to take a new approach to the work. For example, if you’re working on a digital product, could designers start creating visual concepts while the wireframes are being developed? Or can you have two resources working on the same task at once?
Running ideas by the team and having an open dialogue about the approach not only helps you build a more accurate project plan. It gets everyone thinking about the project in the same terms. This type of buy-in and communication builds trust and gets people excited about working together to solve a goal. It can work wonders for the greater good of your team and project.
You should feel comfortable enough at this point to put together a rock-solid project schedule using whatever tool works for you.
Any good project planning tool will help you formalize your thoughts and lay them out in a consistent, visual format that’s easy to follow and track.
Make sure tasks have clear start and end dates so there’s no question when work needs to happen to hit project deadlines. Organize work into phases, and use labels and/or color-coding to improve scannability. The easier your project plan is to understand at a glance, the better!
See how to create a project plan in TeamGantt
Be as flexible as possible when it comes to how your project plan is presented. There's no absolute when it comes to how to format your plan as long as you and your team understand what goes into one.
Remember, people absorb information differently. While you might be partial to a gantt chart, others might prefer to view tasks in a list, calendar, or even a kanban board. You can make all of those variations work if you’ve taken the steps to create a solid plan.
For example, here’s an Agile project plan we built that lists each sprint as its own task group with milestones for sprint planning and deployment.

And here’s what that same project plan looks like if you turn it into a kanban board in TeamGantt. Simply click the Board tab and set up your columns so your team can manage their daily workflows more easily.

If your team currently prefers spreadsheets and isn’t quite ready to use TeamGantt yet, try our free Excel gantt chart template.
Easy drag and drop features with templates for faster scheduling. Plan a project in minutes, collaborate easily as a team, and switch to calendar and list views in a single click.
Create your free planYou’re almost finished! Now it’s time to do your due diligence. It’s easy to throw stuff in a plan, but you have to make sure you get it right.
Your team needs to know the reality of your plan as it stands after you’ve built it out in TeamGantt. And you want to be sure they’re comfortable committing to the details. If they don’t, things will quickly fall apart!
Always review your final plan with your team before delivering it to stakeholders. Why? Because things like dates and tasks—and even assignments—will shift as you formalize the rough sketch of your plan.
Here are a few things you’ll want to discuss with your team as you review the final plan together:
There’s nothing more embarrassing than delivering a plan with an error or a promise you can’t keep. Taking a few minutes to get buy-in from your team will give everyone peace of mind about your plan.
Once you’ve confirmed the plan with your team and have their full sign-off, you’re ready to share your project plan with stakeholders.
When delivering your project plan, make sure you provide an executive summary. This might come in the form of a project brief. A short recap of the overall methodology, resources, assumptions, deadlines, and related review times will help you convey what the plan means to the project and everyone involved.
Project plans can be daunting, so schedule time to present your project plan to stakeholders at a high level. Here are some things you’ll want to point out about your plan during this review:
If a stakeholder is interested in the day-to-day details, feel free to walk them through the plan line by line. Otherwise, start by explaining overall sections or phases, and be sure to come back to your plan at intervals throughout the project to remind them of tasks, next steps, and overall progress.
Some projects are smooth and easy to manage, and others are a complete nightmare that wake you up at 3 a.m. every other night. Thankfully, having a solid project plan is your best defense against project chaos once work gets underway.
Keep in mind that project plans are living documents. Projects change constantly, and someone has to stay on top of—and document—that change. Remember to:
Ready to plan your project in TeamGantt? Follow these easy steps to build a plan that’s structured well and includes the elements you need for project success.
To create a new project plan in TeamGantt, click the New Project button in the upper right corner of the My Projects screen. Then enter your project name and start date, and select the days of the week you want to include in your plan. Click Create New Project to move on to the next step.

Now the real planning fun begins! Enter all the different tasks it will take to get the job done. If there are any key meetings, deliverable deadlines, or approvals, add those as milestones in your project plan.

Scrolling through one long list of tasks can be mind-numbing, even to the best of us. Break tasks down into phases or sections to ensure your project plan is easy to read and understand.
A visual project plan makes it easy to see exactly what needs to get done by when. Make sure every task has a start and end date so nothing falls through the cracks. TeamGantt’s drag and drop feature makes this planning step quick and easy.

Adding dependencies between tasks ensures work gets done in the right order and also helps you plan for delay risks. If your plan shifts and you need to move tasks around, dependencies speed up the process.

That way there’s no confusion about who’s doing what, and your team can update and manage their daily tasks. Don’t forget to check team availability along the way to avoid overloading anyone with too much work.

This feature takes accountability one step further by letting you assign more specific roles to each task: Responsible, Accountable, Consulted, and Informed. Learn how RACI charts work and what each role means.

This makes it easy to see the lift each task involves at a glance. Including hourly estimates in your project plan also enables you to manage workloads and track overages more accurately.

You can use colors to categorize tasks by project phase, priority, department, or team member—whatever makes visual sense to you and your team.

There’s no such thing as too much information if it means your team has what they need to deliver quality work on time. Use the Notes section of your Discussion tab to enter any pertinent details your team will find helpful.

This ensures project files are accessible to everyone in a centralized hub. For example, you might attach your creative brief to the project so your content and design teams have clear direction for completing their deliverables.
If you’re planning a project for the first time or taking on a totally new type of project, you might be struggling to get your plan off the ground. We created a simple project management plan template to help you get started.
TeamGantt gives you the ability to quickly and easily build and adjust your plan using drag and drop scheduling. Plus, it comes with customizable views to fit every team member’s work style.
Try our basic project plan template for free!

Looking for more specific project plan examples to jumpstart your process? Use these project planning templates to generate ideas and save time building out your plan:
Quickly move from plan to action with an online gantt chart that keeps everyone aligned. Create your first project for free!