
Critical path management keeps your project timelines predictable.
Every project manager has felt the stress of expanding timelines. Deadlines come and go as tasks take longer than expected. Suddenly, what seemed like a manageable project is running behind.
The problem usually isn’t poor work or unmotivated teams. It’s that no one clearly identified or actively managed the critical path.
This guide offers an uncomplicated picture of the critical path—no complex math or technical jargon—so you can confidently manage your project schedule.
You’ll learn what the critical path is, plus how to identify it and keep it updated. By the end, you’ll know exactly how to use the critical path to keep your project on track.
What is the Critical Path Method (CPM)?
CPM is a scheduling technique for critical path analysis.
It uses task durations, dependencies, and constraints to find the longest chain of work that sets your project timeline.
CPM was first developed for large construction and engineering projects, where even small delays could quickly become expensive. Today, it’s used on any predictive project where dates and dependencies matter.
What you need to find the critical path
You need a few core details before you can run CPM on your project.
To find the critical path, you must know—or work with your team to identify—the following project details:
- Task durations: How long each task is expected to take
- Dependencies: Which tasks rely on others to start or finish
- Constraints: Rules that limit when a task can start or finish (for example, needs manager approval or must finish before launch)
As your schedule changes, these details change too. That means your critical path can shift over the course of the project, so you’ll need to revisit it whenever you update your timeline.
When to use the Critical Path Method (CPM)
CPM works best when your project has real deadlines and clear tasks.
If your work has fixed dates, many dependencies, and real consequences for delays, CPM gives you the structure you need to protect your timeline.
Use CPM when:
- You’re working toward truly fixed dates, like compliance deadlines, live events, or product launches
- Your project has lots of dependencies and handoffs across teams or trades
- You’re delivering a physical product or asset, such as construction, manufacturing, or installation work
- Project scope is relatively stable, and you can define tasks and durations with reasonable confidence
When other methods might be a better fit
CPM isn’t the only way to plan a project. In some cases, another method—like PERT (Program Evaluation and Review Technique) or Agile—may serve you better.
Use PERT when you need an overall project timeline but:
- Task durations are highly uncertain
- Lead times are long
- Estimates are risky
Use Agile when:
- You’re delivering a digital product or service
- Requirements are likely to change
- You plan work in short iterations instead of a single detailed schedule
For complex, deadline-driven projects—especially with fixed dates or physical deliverables like construction or manufacturing—CPM is usually the strongest choice.
What is float in project management?
Float shows how much a task can move without delaying your project.
Float is the amount of time a task can shift before it affects another task or the project’s final deadline. You might also hear float referred to as “slack.”
There are two common types of float in project management:
- Total float is the maximum time a task can slip before delaying the project finish date.
- Free float is the maximum time a task can slip before delaying its dependent tasks.
Tasks on the critical path have zero float. That means there’s no wiggle room on the start or end date of the task. Any delay on a critical path task pushes the project’s finish date.
How to calculate float for a task
Float is the difference between a task’s early and late dates.
You can calculate float using either of these formulas:
Float = LS − ES
or
Float = LF − EF
Here’s what each term means in your schedule:
- ES (Early Start): The earliest date a task can start, based on its dependencies
- LS (Late Start): The latest date a task can start without delaying the project finish
- EF (Early Finish): The earliest date a task can finish, based on its start date and duration
- LF (Late Finish): The latest date a task can finish without delaying the project finish
In practice, most teams use LS − ES to find the float for a task. The larger the result, the more flexibility you have. If the result is zero, that task is on the critical path.
To use these formulas, you’ll need a clear list of tasks or deliverables—often captured in your work breakdown structure (WBS)—plus each task’s duration and its dependencies. From there, some basic addition and subtraction gets you to the Early Start (ES) and Late Start (LS) dates for each task (and the matching finish dates).
Once you have those dates, subtract the Early Start from the Late Start (LS − ES), and the result is the float—or slack—for that task.
Float calculation example
This concept makes more sense in practice, so let’s walk through a basic example to determine a project’s critical path.
In this example, tasks A, B, and D have no flexibility on their start or end dates. That makes them zero-float tasks. Task C is non-critical because it has room to shift without affecting project completion.
The critical path in this analysis is A → B → D since those tasks must finish on time to prevent project delays.
Multiple or near-critical paths
Near-critical paths are task chains that are almost as long as your main critical path. They usually have very low float, so even small slips can put them on the critical path.
Few projects are as straightforward as the example above. In large or complex projects, you may not have just one critical path. Two or more sequences can share the same longest duration and all have zero float—these are multiple critical paths.
Actively monitor both critical and near-critical paths so delays don’t put your project completion date at risk.
How to run a critical path analysis on your project
Now that you understand float and near-critical paths, you’re ready to find the critical path in your own project.
Finding the critical path is a step-by-step process that turns your task list into a realistic, deadline-driven schedule.
1. List all tasks and estimate durations
A reliable schedule is built on a complete task list and realistic durations.
Start with a full list of tasks and deliverables. Lean on seasoned project managers or the people doing the work to estimate how long each task will take.
Encourage realistic estimates—not best-case guesses. Overly optimistic durations are one of the fastest ways to create schedule delays.
2. Define dependencies and constraints
Dependencies and constraints set the order of work and determine how delays affect the schedule.
Identify which tasks rely on others to start or finish. Whether you’re using a work breakdown structure or a Gantt chart, be sure to document those relationships clearly.
Common dependency types include:
- Finish-to-Start (FS): Task B can’t start until Task A finishes
- Start-to-Start (SS): Task B starts when Task A starts
- Finish-to-Finish (FF): Task B finishes when Task A finishes
- Start-to-Finish (SF): Task B can’t finish until Task A starts (less common in most projects)
Don’t forget about constraints at this stage either. Constraints include resource availability, calendars, or external approvals—anything that limits when a task can start or finish and may impact its duration or dependencies.
3. Visualize the schedule with a Gantt chart or network diagram
A visual schedule makes the critical path easier to see and understand.
Map your tasks, durations, and dependencies into a network diagram or Gantt chart so you can see how work flows from start to finish.
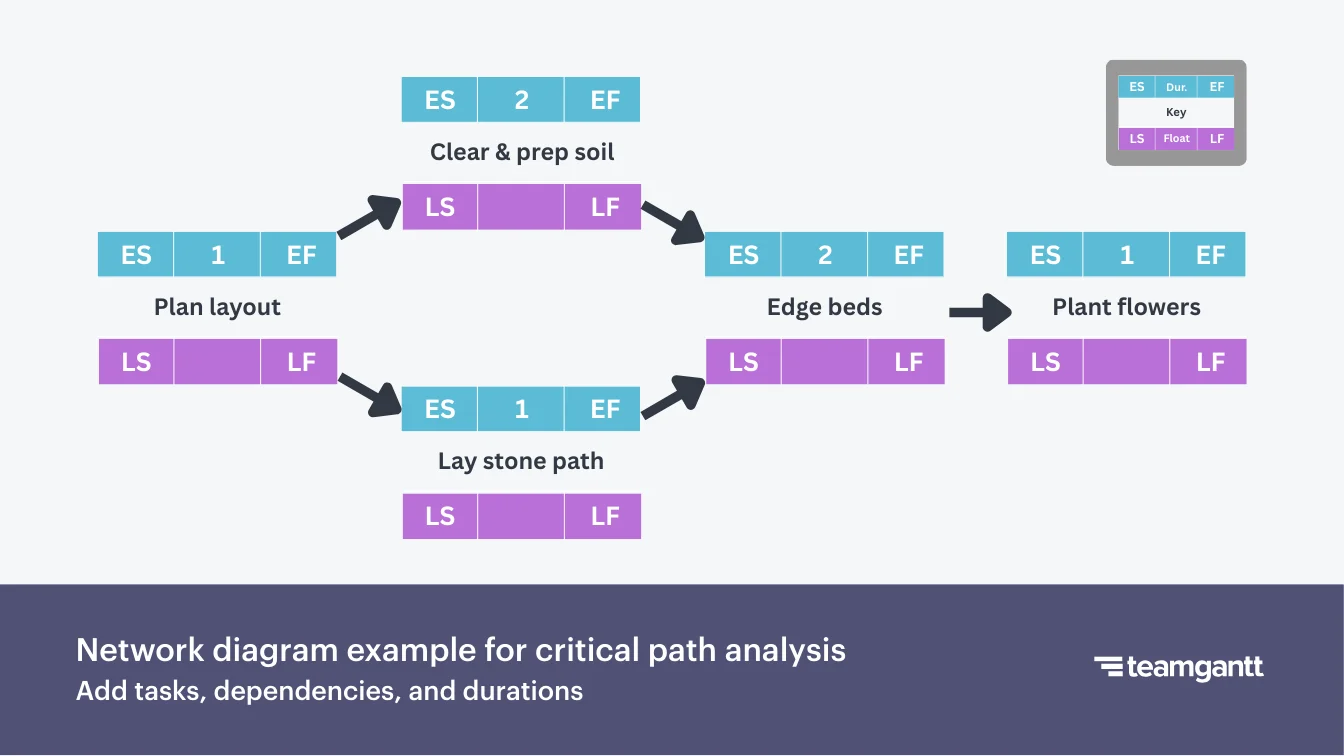
A network diagram shows tasks as boxes and dependencies as arrows, like the garden example below. It’s a simple way to follow the logic of the Critical Path Method when you’re first learning it.
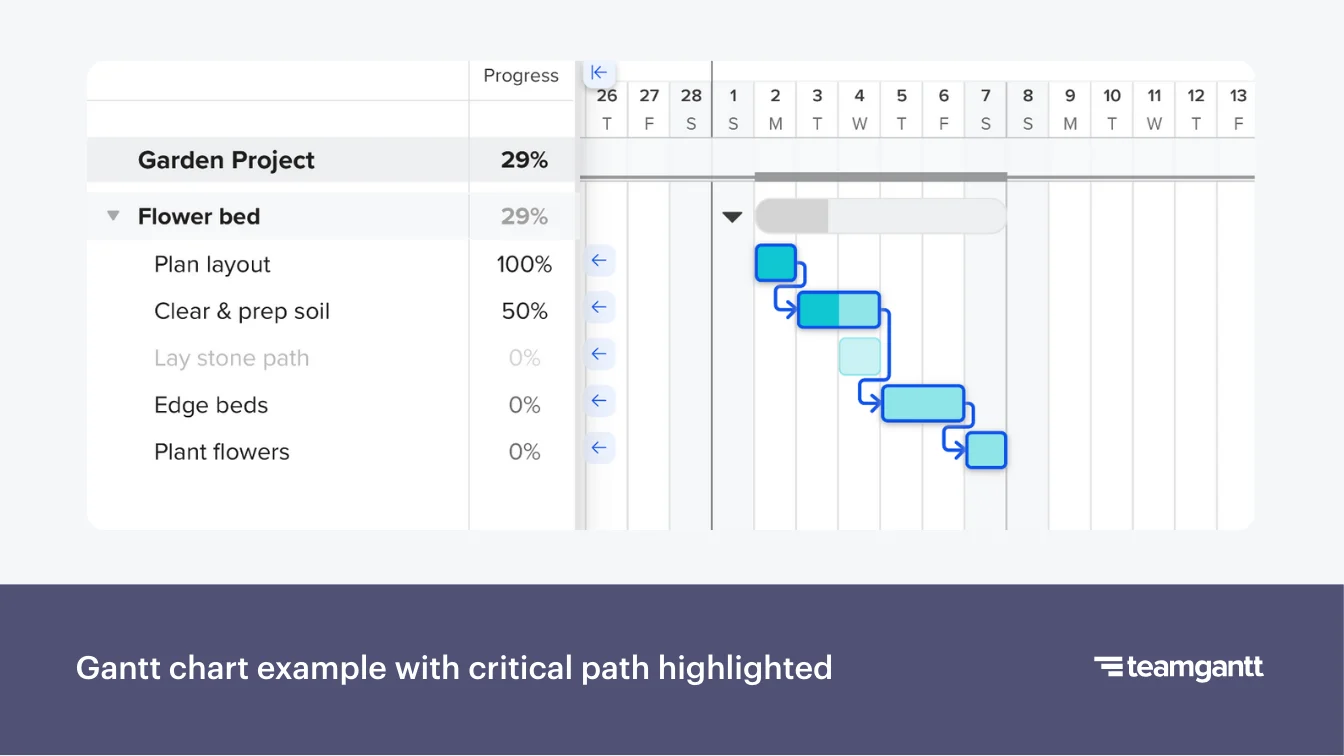
A Gantt chart shows tasks on a timeline with bars and dependency lines. On real projects, it’s often simpler to drop everything into a Gantt chart from the beginning. That’s because seeing tasks laid out on a timeline—and highlighting critical tasks—makes the longest path easier to identify.
4. Perform forward and backward passes
Forward and backward passes give you the early and late dates for every task.
Start with a forward pass, moving left to right through your network diagram or Gantt chart. For each task, use the previous task’s Early Finish and the current task’s duration to calculate its Early Start (ES) and Early Finish (EF) dates.
In the forward pass diagram below, you can see ES and EF values shown above each task as you move from left to right.

When you reach the final task, switch to a backward pass, moving right to left. Work from the project’s required finish date to calculate each task’s Late Finish (LF) and Late Start (LS) dates. These are the latest dates that task can finish or start without delaying the overall project.
In this backward pass diagram, LS and LF appear under each task as you move from right to left.

5. Calculate float and confirm the critical path
Float turns your task dates into a clear critical path.
Use the values from your forward and/or backward passes to calculate float for each task. For most projects, LS − ES is the simplest way to find float.
Float = LS − ES
Tasks with zero float are on your critical path. Tasks with very low float are near-critical and need closer monitoring as the project runs.
The diagram below highlights tasks with zero float—your critical path for this garden project.

6. Verify the critical path against your baseline
Your baseline is the original plan you’ll measure progress and changes against.
Before you lock in that baseline, make sure the critical path in your schedule actually matches how the work needs to happen in the real world. Check that the right tasks are marked as critical, in the right order, with realistic handoffs and constraints.
If something feels off, adjust durations, resources, dependencies, or deadlines until the critical path lines up with the way your team will execute the project. If you have more than one critical path, run the same check on each chain.
7. Check near-critical paths and put them on a watch list
Near-critical paths can become critical with just a small delay.
Look for tasks and paths with low float—for example, one or two days of flexibility. These are your near-critical paths. Add them to a watch list so you can monitor them closely.
Review low-float tasks every time you update your schedule. Watch for scope changes, resource conflicts, or delayed approvals on these paths. Treat major risks on near-critical paths almost as seriously as risks on the critical path itself.
How to keep the critical path on track
The critical path is dynamic, not fixed. That means you need to manage it proactively. Here’s how to keep it on track as your project evolves.
1. Recalculate regularly
Your critical path should always reflect your current plan.
Recalculate the critical path anytime you make major changes to your schedule—like shifting key dates, adding scope, or updating task durations. For longer projects, build regular check-ins into your rhythm (for example, once a week or at each major milestone).
Each time you update the schedule, confirm which tasks are now critical and whether any new near-critical paths have popped up.
2. Make near-critical paths part of regular status checks
Small slips on near-critical paths put your finish date at risk.
Now that you’ve identified tasks with low float, review them whenever you update your schedule or prep for a status meeting. Ask questions like:
- Has any near-critical task slipped since the last update?
- Could new risks, scope changes, or approvals affect these tasks?
- Do any near-critical tasks need additional support or resources to stay on track?
Catching issues early on near-critical paths keeps them from quietly becoming your new critical path.
3. Avoid false critical paths
False critical paths hide the real work that drives your finish date.
Overly rigid constraints or calendar settings can create tasks that appear critical but aren’t.
When something shows up as critical, sanity-check it against how the work really happens. Ask yourself:
- Is this task truly gating a major milestone or finish date?
- Did a fixed start or finish date or “must start on” constraint force it onto the critical path?
- Is a calendar setting (like non-working days or holidays) making this task seem tighter than it really is?
If a task is marked as critical but doesn’t control your finish date, loosen the constraint or adjust the calendar so your schedule reflects reality. No need to make your life more complicated than necessary, right?
4. Use resource leveling to prevent overload
Resource leveling keeps people and equipment from becoming bottlenecks.
Resource leveling means adjusting task timings or assignments so no one has too many critical tasks on their plate. It keeps your plan realistic and doable.
Look for:
- Team members who are double-booked on critical tasks
- Specialists or key equipment that appear multiple times along the critical path
- External partners who support several critical or near-critical tasks
When you spot conflicts, stagger tasks, reassign work, or adjust dependencies so critical tasks get the focus they need. That helps prevent last-minute surprises that delay your finish date.
5. Apply schedule compression carefully
Schedule compression shortens your timeline—but can come with tradeoffs.
Schedule compression is any technique you use to reduce project duration without changing scope. In practice, that usually means:
- Crashing: Adding people or resources to critical tasks to speed things up
- Fast-tracking: Working on critical tasks in parallel instead of one after another
More hands don’t always make light work. Schedule compression can introduce risks like rework, burnout, and quality issues if you’re not careful. Consult with technical experts to confirm whether adding resources or overlapping tasks will truly help the project.
Schedule compression makes sense when:
- You have a truly fixed deadline
- The tasks are on or near the critical path
- Quality and safety won’t be compromised by going faster
Use these techniques sparingly so you can hit your deadline without sacrificing quality.
Common critical path problems and how to fix them
Even the best project plans run into challenges. Recognizing common critical path problems early—and knowing how to address them—can be the difference between hitting and missing your deadline.
Here’s a look at common issues that pop up, why they happen, and practical fixes that keep your project on track.
1. Delayed approvals
Problem
Key tasks are waiting on approvals from managers, clients, or external stakeholders. Those delays keep dependent tasks from starting and can stall your critical path.
Common causes
- Approvers are overloaded or unavailable.
- Deadlines and expectations aren’t clearly communicated.
- Approval steps aren’t built into the project plan.
Solutions
- Build approval tasks into your schedule with realistic timelines and clear owners.
- Set reminders or automated notifications so approvers know when feedback is due.
- Follow up proactively and explain how approval delays affect the overall finish date.
- Look for work that can progress in parallel while you wait, as long as it doesn’t depend on the final approval.
Example
A marketing campaign needs client approval on ad creatives. If feedback is delayed by 3 days, design and production can’t start, and the launch date slips. Sending reminders and scheduling weekly check-ins can help prevent these bottlenecks.
2. Resource overload
Problem
Critical resources—like key team members, equipment, or budgets—are stretched across too many tasks. Work slows down, and critical or near-critical tasks start to run late.
Common causes
- Poor resource allocation across tasks or projects
- Lack of visibility into resource availability when building the schedule
- Overlapping assignments on critical path or near-critical tasks
Solutions
- Level resources across tasks to prevent overload on critical and near-critical work.
- Monitor capacity when assigning work and adjust allocations as needed.
- Bring in additional help temporarily or redistribute tasks to less busy team members.
Example
A concrete crew is scheduled to pour the foundation for Building A and the slab for Building B in the same week—both on the critical path. Rain sets the first pour back by 2 days. That delay pushes the slab work out and delays the framing start.
Bringing in a second crew for the slab removes the bottleneck and keeps the overall schedule on track.
3. False constraints or calendar errors
Problem
Tasks appear critical in your schedule even though they don’t truly drive the finish date. These “false critical paths” create unnecessary urgency and pull focus away from the work that actually matters.
Common causes
- Artificial constraints like “must start on Monday”
- Incorrect calendar settings (holidays, working hours, time zones)
Solutions
- Review constraints and remove unnecessary fixed start and finish dates.
- Verify calendar settings are accurate for your team’s real working days and hours.
- Recalculate the critical path after adjustments to be sure it reflects reality.
Example
A content creation task is set to start on a Monday due to a default calendar rule. The task has zero float only because of this rigid start date—not because it drives the finish date. Adjusting the calendar or dependency reveals the true critical path.
4. Near-critical task shifts
Problem
Tasks with low float (near-critical tasks) suddenly become critical after minor delays, putting your finish date at risk.
Common causes
- Ignoring low-float tasks during monitoring
- Resource conflicts or unforeseen delays on near-critical work
- Changes in the duration of dependent tasks
Solutions
- Watch for near-critical tasks that start to lose float or hit zero and temporarily treat them as critical.
- Adjust resources or sequencing to protect the finish date.
- Update the schedule and recalculate the critical path after any adjustments.
Example
Landscaping has one day of float before it affects the final walkthrough and closing date. A few days of heavy rain push the landscaping crew back by a day, using up the buffer and putting the task on the critical path. Now closing is at risk.
Tracking landscaping as near-critical prompts you to coordinate with the subcontractor to prioritize this house as soon as the weather clears. That way, you can still hit your date.
5. Dependency mismanagement
Problem
Incorrect or overly complex dependencies make the schedule fragile and confusing. That leads to unexpected delays and misleading critical paths.
Common causes
- Overcomplicating task relationships
- Missing or incorrect dependencies
- Dependencies not updated after scope or sequencing changes
Solutions
- Simplify dependencies so they reflect actual workflow.
- Regularly review dependencies for accuracy, especially on critical and near-critical tasks.
- Adjust dependencies as soon as project scope or order of work changes.
- Work with your team to identify dependencies from the start.
Example
Linking a design review task to multiple unrelated tasks creates unnecessary dependencies. Minor delays in those other areas appear to impact the critical path. Removing unnecessary links brings clarity back to the schedule.
6. External delays
Problem
Tasks that depend on external parties—like vendors, regulatory bodies, or clients—cause delays that ripple through your schedule.
Common causes
- Vendor or client schedules missing from your plan
- Unanticipated regulatory or inspection delays
- Lack of buffer time for high-risk external tasks
Solutions
- Map out external dependencies early.
- Include realistic buffers for external deliverables and approvals.
- Communicate deadlines and expectations clearly with external partners.
- Identify internal tasks that can keep moving while you wait.
Example
A product can’t launch until a vendor delivers artwork. You build breathing room into the schedule and conduct frequent check-ins with the vendor. This enables other critical tasks to continue while you wait for the final files.
7. Lack of real-time tracking
Problem
Schedules go stale quickly when updates aren’t tracked in real time. These gaps lead to misinformed decisions about your critical path.
Common causes
- Manual tracking in spreadsheets
- Delayed or inconsistent status updates from team members
- No system for recalculating the critical path automatically when work changes
Solutions
- Keep a single shared schedule everyone can update in real time.
- Ask team members to update task progress as soon as work starts, slips, or finishes.
- Use project management software with automatic critical path calculation.
- Make the critical path visible to the team so adjustments can be proactive.
Example
A copy-paste error in a spreadsheet shifts start dates for several tasks, making the schedule look fine on screen but throwing off the real critical path. Nobody notices until a key deadline slips because the spreadsheet never flagged the change.
After that release, the team moves their schedule into TeamGantt so task updates and critical path changes are handled automatically and everyone sees the same up-to-date plan.
Critical path mistakes to avoid
Even a solid critical path can fall apart if you don’t pay attention. Avoiding a few common mistakes keeps your critical path clear, stable, and useful—exactly what you need for confident delivery.
Here are pitfalls to watch for—and how to fix them early.
Underestimating task durations
Overly optimistic task durations hide risk on your critical path.
This usually happens when you assume ideal conditions instead of real-world ones. When tasks run long, the critical path shifts. Suddenly your “on-track” project isn’t.
Overcomplicating dependencies
Too many dependencies make your schedule fragile.
When you link everything to everything, one minor delay can cause a domino effect across tasks that don’t need to be connected.
Ignoring float
Ignoring float blurs the line between urgent and non-urgent work.
It’s easy to treat all tasks as equally urgent, but float exists for a reason. If you don’t track it, a slipping non-critical task can turn critical without warning.
Not rebaselining after major scope or timeline changes
A stale baseline turns status reporting into guesswork.
If your schedule doesn’t reflect reality, you can’t measure progress accurately—and your chances of hitting the deadline drop fast.
Neglecting communication
Your critical path can’t guide the work if no one sees it.
Teams can’t follow a schedule they don’t understand. If your timeline lives in your project tool but never in team conversations, it’s not really driving day-to-day decisions.
Examples of the critical path in action
Once you understand the concepts, it helps to see how the critical path plays out in real projects. These examples show what happens when a critical task slips—and how you can use the critical path to get things back on track.
Construction example
Critical path: Framing → Electrical → Drywall
Framing finishes on time, but the electrical inspection is delayed by 3 days. Since drywall can’t start until inspection is complete, the rest of the schedule shifts with it.
This is a great opportunity to use schedule compression on the remaining critical path. For example, bringing in an additional drywall crew or scheduling overtime might help you recover some of the lost days without cutting corners on safety or quality.
Marketing campaign launch example
Critical path: Content & creative approvals → Build pages & assets → QA → Launch
Let’s say approvals delay content and creative assets, so landing pages, QA, and launch all get pushed back. One way to reduce the impact is to build the site infrastructure and templates while you wait for final approval.
If you still need to make up time later, you could add extra QA support to help the team move through testing faster and get the campaign out the door.
Software release example
Critical path: Design feature → Build → QA → Release
It’s happened before: A single developer owns too many critical tasks and becomes a bottleneck. This is where resource leveling comes in handy.
Review your schedule’s critical path to see where that developer is overloaded. Then shift non-critical work to other teammates so they can focus on the most important tasks and keep the release moving.
Keep your critical path on track with TeamGantt
Critical path management gives you control over your schedule. When you know which tasks drive your finish date—and how float, dependencies, and resources affect the timeline—it’s much easier to spot risks early and keep projects on track.
TeamGantt makes that work simpler with features built for critical path management:
- Gantt charts with drag-and-drop scheduling
- Flexible task dependencies with custom lead and lag
- Critical path visibility with highlighting and automatic recalculation
- Baseline tracking
- Global Workloads view across all projects
- Easy collaboration on a shared project schedule
Ready to put the critical path to work on your next project? Start a free trial of TeamGantt and see how much easier it is to plan, track, and deliver on time.