
If you’re a project manager, you know resources are critical to your company’s success. But it can be tough to ensure team members have enough work to keep them busy without being overloaded.
Add non-people resources to the mix, and your job gets even more complex.
So how do you strike a balance and put the right resources in the right place at the right time? It all boils down to effective resource management.
Using an online gantt chart streamlines resource management, ensuring your team stays aligned and productive. In this article, we'll explore common resource examples and ways you can schedule and manage resources with a gantt chart.
What is project resource management?
Project resource management is the process of planning, scheduling, and optimizing resources to deliver a project on time and budget.
From the human perspective, it’s all about staffing your projects with the appropriate people to meet your project goals. This might mean taking your team’s skills and availability into account as you build project plans and outsourcing work when needed to bridge resource gaps.
Examples of project resources
Projects often rely on both tangible and intangible resources, which may be shared across your organization. Examples of project resources include:
- Team members
- Key stakeholders
- Supplies
- Facilities
- Technology
- Finances
- Specialized skills and expertise
Why is resourcing important in project management?
Resource gaps make it hard to run a profitable business customers can rely on. That’s why it’s more important than ever to keep your workforce happy and productive.
If you’ve ever missed a project deadline because you were understaffed and overbooked, you understand the stress it can cause. Effective resource management gives you and your team the confidence to say yes to projects with a clear plan for how and when you can deliver goods and services.
As you get a better handle on resources and timelines, your team will find it easier and easier to meet goals efficiently. That means your team can enjoy better work-life balance, while your business benefits from happier customers and a healthier bottom line.
What does the resource management process involve?
The resource management process can generally be broken down into 3 high-level phases. Let’s take a brief look at each stage.
- Resource planning: Resource planning involves identifying resource requirements and dependencies so you can estimate project time and costs more accurately.
- Resource scheduling: Resource scheduling is where people get assigned to the work you’ve scoped out on your project timeline. The goal is to match the right skills and materials to the task and ensure deadlines are realistically aligned with resource capacity and availability.
- Resource optimization: Resource optimization is the process of monitoring utilization once work gets underway and adjusting allocation to minimize idle time and avoid resource conflicts and/or overload.
How to manage resources in a project using a gantt chart
Visibility is key when it comes to knowing who or what is available for a job so you can confidently schedule resources and consistently deliver work on time and budget.
Gantt charts provide a clear visual for every aspect of your project plan. You can see what’s scheduled when and who’s assigned to the task—all in a single glance. And TeamGantt makes it simple to view resource availability and rearrange timelines and assignments with the ease of drag and drop scheduling.
Let’s take a closer look at how you can use TeamGantt's resource management software to plan, schedule, and optimize project resources throughout the resource management process.
1. Identify the resource requirements for your project
The first step you’ll want to take is simple: Figure out who and what you need to get the job done. This could include team members, stakeholders, or contract workers on the people side and physical assets like equipment, facilities, or material supplies.
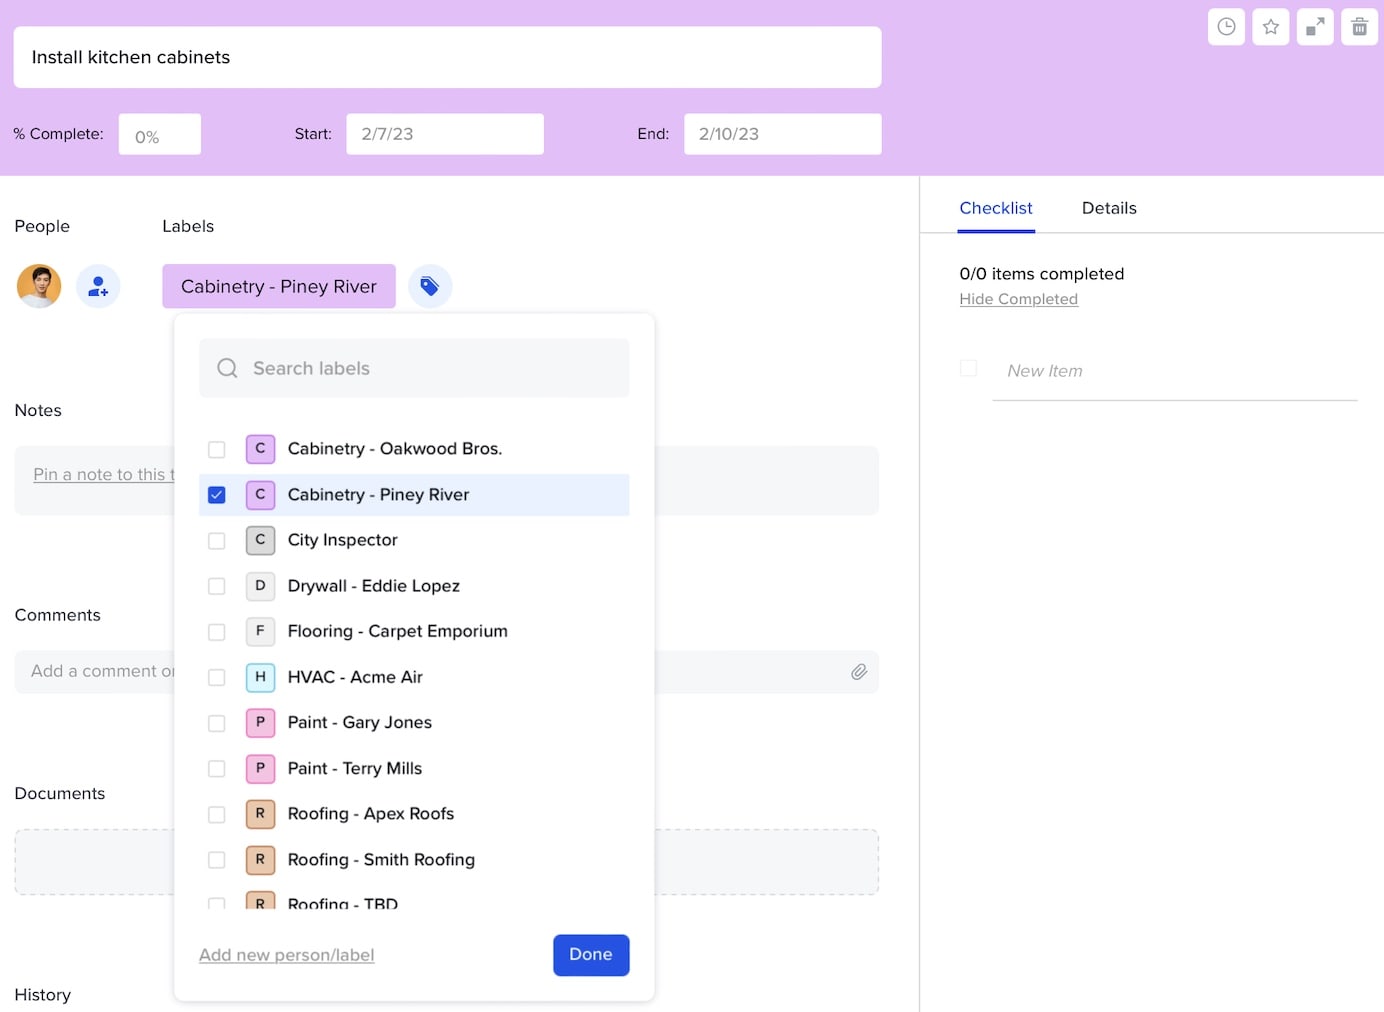
Once you’ve nailed down your resource requirements, go ahead and set these resources up in your project. In TeamGantt, you can add resources as either People or Labels. Here’s how to use these 2 resource types.
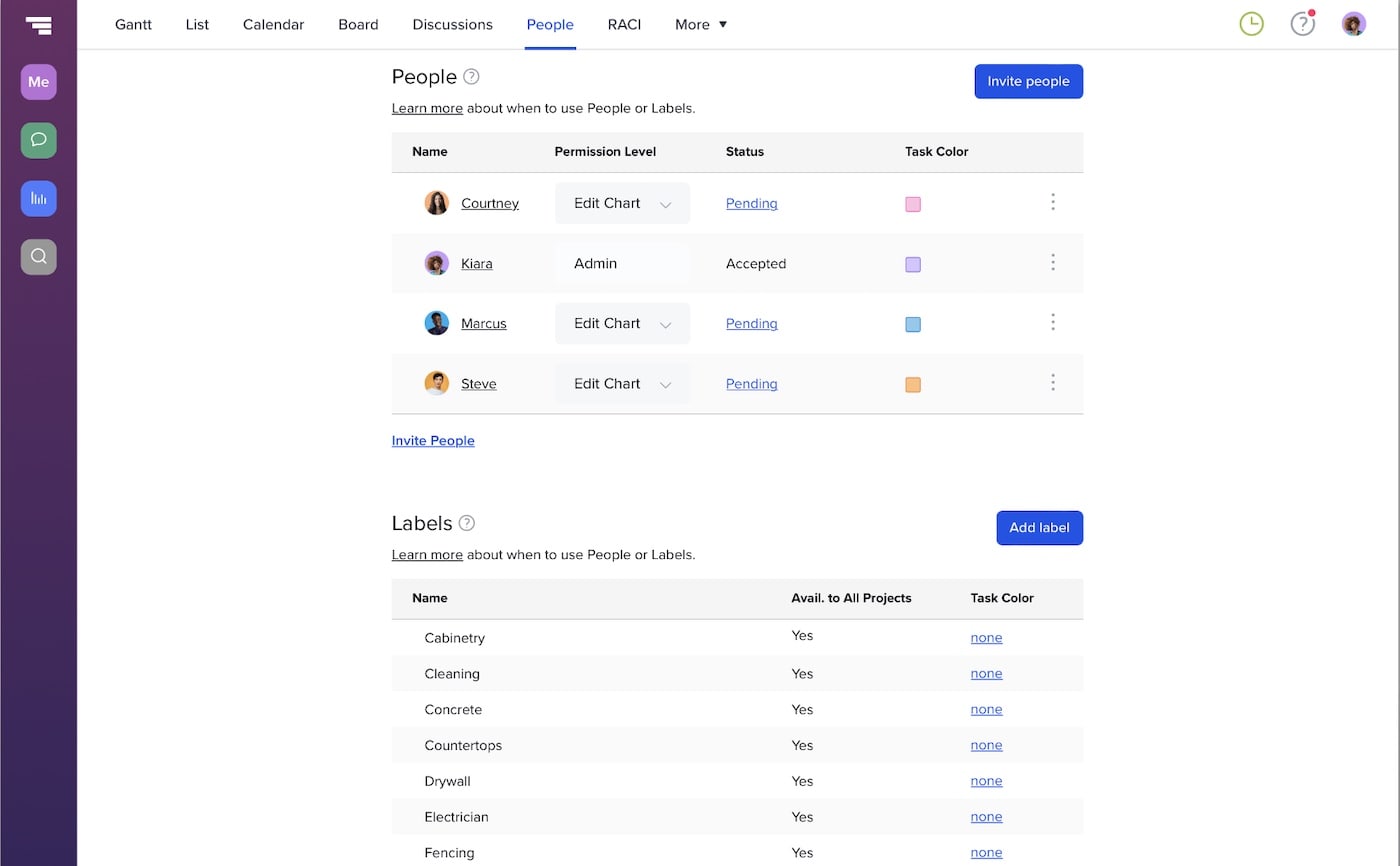
Use People to invite key players to your project
People are exactly that—actual humans who have some level of responsibility for tasks in a project. Inviting your team and stakeholders to a project—or at least those who will play an active role—allows you to assign them to tasks so you can collaborate on work together.
In TeamGantt, People have an email address associated with their name in the project so they’ll receive notifications when tasks are assigned or rescheduled. They’ll also be alerted if anyone tags them in a project discussion.
Learn more about People and permissions.
Use Labels to track non-personnel resources or high-level groups
Labels are flexible tags that enable you to filter and organize your project. You can assign them to tasks—and track their availability—just as easily as People in TeamGantt.
Since Labels aren't associated with an email address, they’re perfect for non-personnel resources. You can also use them to represent collective project resources, like departments, trades, or crews who don’t need to receive TeamGantt notifications.
2. Assess resource availability before scheduling work
Being able to see the entire workload of your whole team is a huge benefit while you’re planning and scheduling your project.
Can Ben take on any more design work right now or is his plate already pretty full? Zach looks like he’s got a pretty light workload over the next couple days. He could pick up the slack. The marketing team is pretty busy for the next 60 days so maybe now isn’t the best time to take on that new client. You get the picture.
Here are a few simple ways you can figure out who and what’s available to get the job done.
Use the Workloads tab to check availability across all active projects
In many project management tools, scheduling and resourcing are handled in different parts of the app. This can cause a lot of back and forth and make it tough to get a true sense of availability across all your projects.
In TeamGantt, you can check resource availability against your project schedules in one view—saving you tons of time and frustration. Simply click the Workloads tab at the bottom of your gantt chart to expand it.
Each person and label you’ve added to the project will be listed along the left, with the number of tasks (or hours) assigned to that resource for each day. The more booked a person or resource is, the darker the cell color. Think of it like your very own resourcing heat map!
Clicking on one of the numbered cells will open a popup of all tasks assigned to that person or label on that particular day. Select any task listed to go to the project timeline and adjust the schedule, as needed.
Apply project filters to view schedules by resource
In TeamGantt, you can open multiple projects at once and filter your gantt chart based on Person, Label, Date, and/or Task Color. This allows you to view schedules in easy-to-digest chunks and is especially useful for managing resources across a long timeline of tasks.
One TeamGantt customer uses this approach to determine when subcontractors are available so they don’t overbook their crews or end up with a big gap in the construction schedule. Proper scheduling ensures no phase is left idle, helping you avoid construction delays down the line.

Use bookmarks to save filtered views
TeamGantt also offers the ability to bookmark pages for later use. This enables you to save resource-specific views of your project—or a filtered view of multiple projects—so you don’t have to recreate the wheel every time.
Have a meeting with the marketing team? Open up your active projects, and filter the view down to marketing-related tasks—all inside a single gantt chart with the click of a button.

3. Apply hourly estimates for better capacity planning
Project estimation is an important skill for any project manager because it can make or break success. Estimate too much time, and you might have idle workers or equipment sitting around. Estimate too little, and it’s a recipe for delays—not to mention disgruntled teams who feel pressured to put in long hours just to get the job done. The trick is finding a happy medium.
The combination of hourly estimation and time tracking in TeamGantt is a powerful set of tools that not only lets you track the real amount of time your team spends on tasks. It also helps you get better at estimating future projects.
Here’s how to use these features to improve your project resource management process.
Add hourly estimates to project tasks
To add an estimate to a task, just enter the number of hours you think the task will take in the estimated hours column of the gantt chart. You don’t have to use whole numbers here. For 30 minutes, just use 0.5 hours, for example.
Break task estimates down by assigned resource
Once you have a total number of estimated hours for the task, you can break it down across any people or resources assigned to that task.
For example, let’s say you estimated 12 hours for a task, with work spread across 2 days.
- If 1 person is assigned to the task, TeamGantt will automatically assume that team member will work on that task for 6 hours per day for the 2 scheduled days.
- If multiple people are assigned to the task, you can break the estimated hours up however you like across the assigned people/resources.
As any person assigned to a task with an estimate updates their percent complete, you’ll begin to see a visual representation of how on-time, ahead of, or behind schedule a task is.

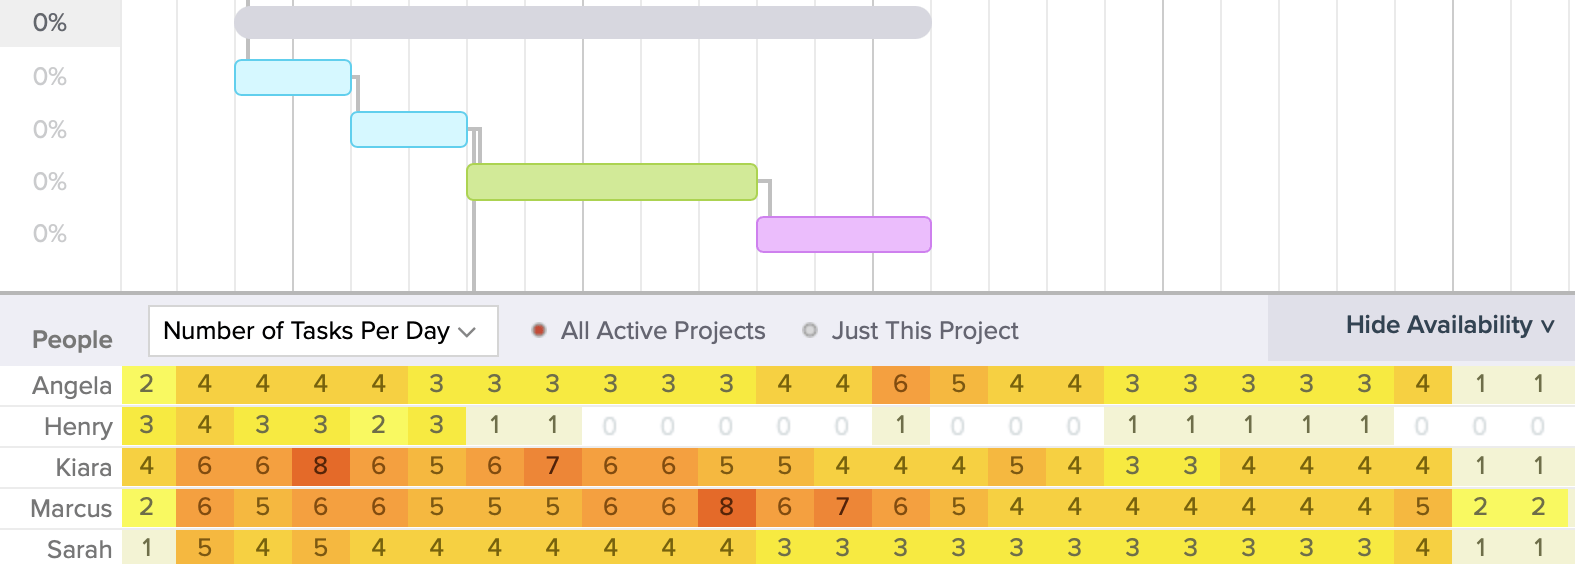
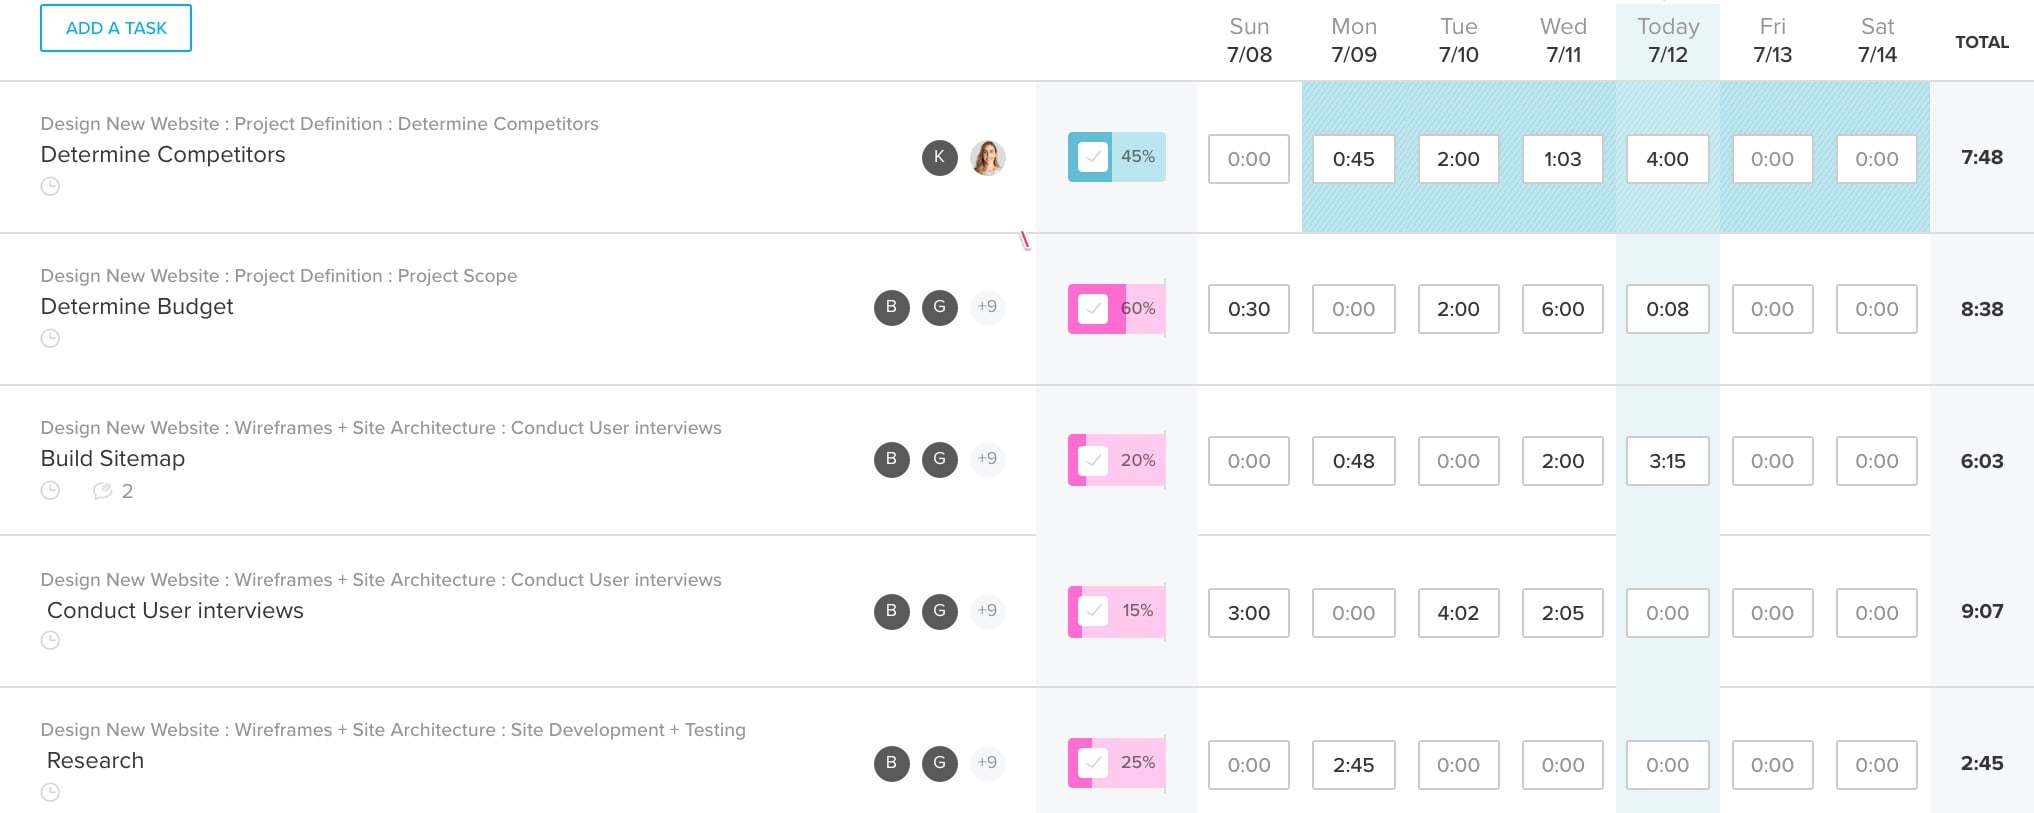
View resource availability by hours per day vs. number of tasks per day
The Workloads tab at the bottom of your gantt chart gives you the option to view availability by either hours or tasks per day.
.gif)
Knowing how many tasks a person or resource is assigned to is important, but it doesn’t always give you a clear picture of capacity. For example, if Joe has 6 tasks and Heather has 1 task assigned on Tuesday, you might assume Joe’s maxed out for the day and Heather can handle a last-minute task that popped up.
But what if Joe’s 6 tasks were only estimated to take 30 minutes each? That’s only 3 hours of work. Even if Joe’s tasks take a little longer than the estimate, he’s still probably only logging a half day.
Heather’s 1 task, on the other hand, is estimated to take 8 hours. Even if everything goes as planned for Heather’s task, there isn’t enough time in the day for her to take on another assignment.
Hourly estimating gives you the visibility you need to ensure work gets distributed in a way that makes sense for your team and your project.
4. Schedule resources to your project
Once you’ve figured out who and what is available when, resource scheduling is quick and easy in TeamGantt. Simply assign the person or resource to the task, and use drag and drop scheduling to set or adjust dates.
When you add someone to a project as a People resource, they’ll automatically receive email notifications from TeamGantt anytime they’re assigned to a new task or a task they’re assigned to has been rescheduled.
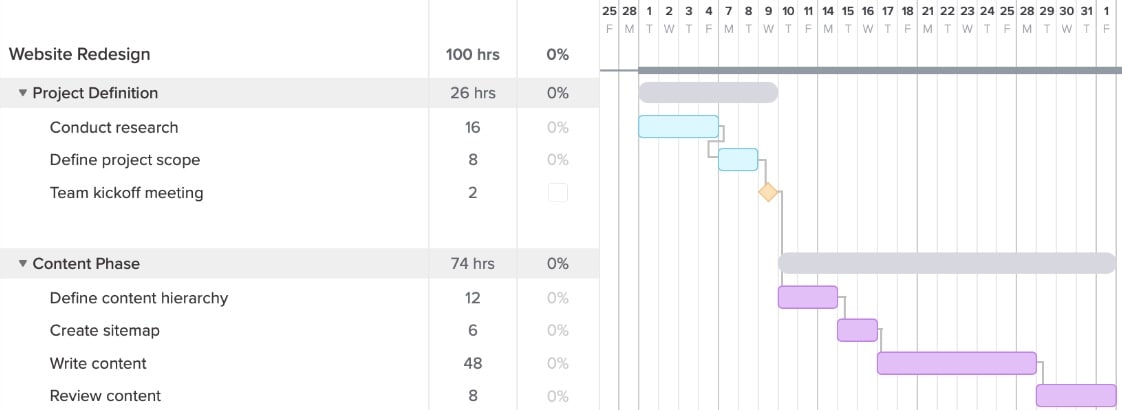
If tasks need to happen in a certain order, be sure to add dependencies. In TeamGantt, dependencies appear as light gray lines connecting two tasks on your gantt chart. To create a dependency, simply click the dot at the end of the first task, and drag it to the beginning of the dependent one.
5. Show your team how to manage their task assignments
It’s a whole lot easier to make resourcing decisions when you know where things are and what people are doing. Inviting people to your plan gives them access to their schedule so they know what to expect and can track progress on deliverables in real time.
Here are a few pointers to get your team engaged in your resource management plan.
Demonstrate the My Tasks view
My Tasks enables each person to see all their assigned tasks across projects in a single view—whether they prefer to view it as a list, calendar, or gantt chart. This makes it easy for them to prioritize their time because they know ahead of time what's expected of them and when it’s due.
My Tasks is the perfect go-to for team members who want to update progress and collaborate on tasks without the clutter of work that isn’t relevant to them.
Sync project schedules with a personal calendar
Got team members who travel or want to keep their families in the loop about their work schedule? Let them know they can sync their TeamGantt tasks to their favorite calendar app. That extra bit of visibility enables employees to balance their work and personal schedules more easily.
Get instructions for syncing TeamGantt tasks to Google Calendar, iCal, or Outlook.
Track time to tasks
Time tracking not only enables you to keep track of billable hours. It gives you a history of actual time spent on tasks so you can forecast and plan resources better with every new project you take on.
Team members can track time to tasks from the My Tasks, Gantt, or List view or enter and adjust time directly from their Time Sheet.
6. Monitor and optimize resource utilization
Project resources require ongoing management to prevent unexpected downtime and employee burnout. Here are some easy ways you can monitor and optimize resources as schedules and priorities shift.
Use the Workloads report to view and adjust resource allocation
While the Workloads tab at the bottom of the gantt chart will only show you people who are invited to that project, the Workloads report enables managers to view availability for everyone in your TeamGantt account. It’s a great tool for assessing overall resource utilization across all your active projects.
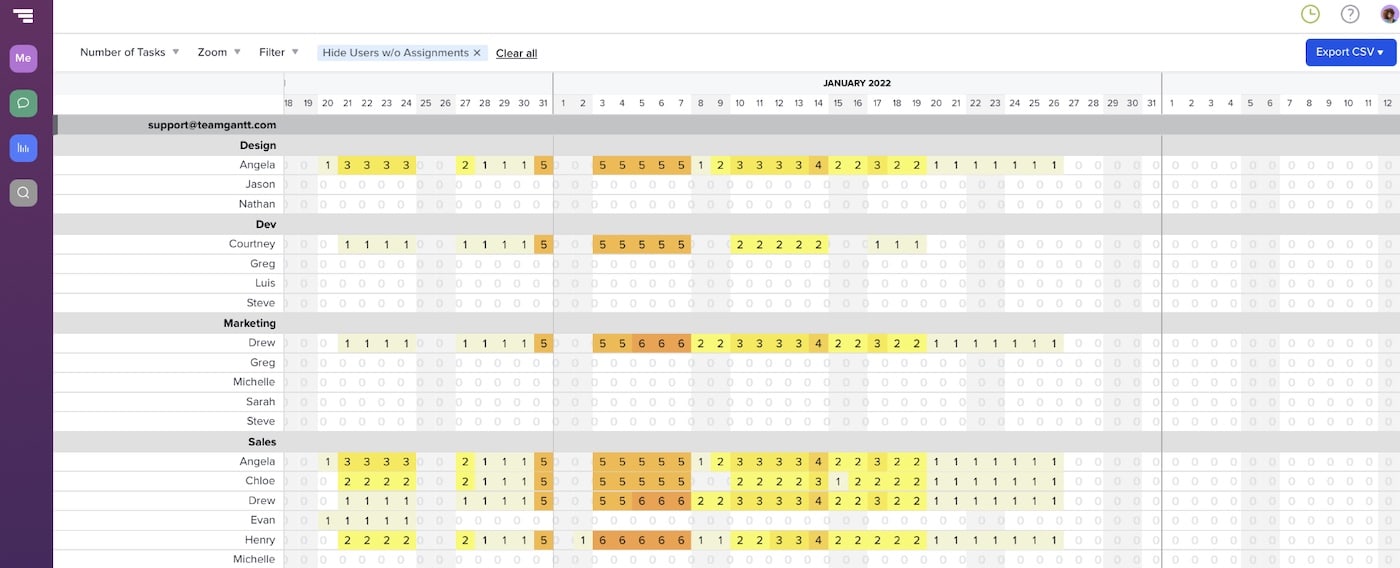
Just like the Workloads tab, you can view this based on hours per day or number of tasks per day, and there are a couple of basic filters like Hide Completed Tasks and Hide Users Without Assignments.
The Workloads heat map makes it easy to spot people or resources that may be over- or underutilized. If a resource appears overloaded on a particular date, click on the numbered cell to review all the tasks assigned to the person or label that day. Select any task listed to open the project timeline and reallocate resources or adjust the schedule, as needed.
Track progress and billable hours against estimates
If your team regularly tracks their hours and progress, that makes it a whole lot easier for you to ensure your project finishes on time and budget. That’s because TeamGantt provides a clear visual for seeing how actual work is tracking against your plan.
Simply look for the thin striped line that appears inside each taskbar. This indicator tracks how work is pacing against your estimates so you can catch overages before they cause problems. It can also alert you to tasks that are on track to finish early, freeing resources up for other work.
Let's take a closer look at 2 different ways this simple striped line helps you compare task progress with your plan.
- The color of the striped line tells you whether time tracked has exceeded the task’s estimate. Green means you’re still on course, and red means you’re over-budget.
- The length of the striped line indicates how progress is pacing against time tracked. If the striped line is shorter than the progress bar, you’ve got cushion. If it’s longer than the progress bar, this task or group is at risk for overage because the ratio of tracked vs. estimated hours is higher than the percent complete.
Plan your next project in minutes
When you’re a project manager, every minute counts. So why waste time building out a bunch of complicated spreadsheets just to keep tabs on a project?
At TeamGantt, you don’t have to. Our gantt chart software enables you to stay focused on the tasks that move the needle. Whip up a project plan in minutes, and watch your team cross the finish line faster. It really is that simple.