Good content takes time, and you've got goals to hit and deadlines to meet. When production runs without a schedule, one late handoff can push everything back.
A content calendar keeps publish day from slipping. Every piece gets an owner, a due date, and room for the work behind it, so your team can plan week to week.
In this guide, you'll learn how a content calendar differs from an editorial or social media calendar, what to track for every piece, how to build one in 7 steps, and how to keep it on track once your team starts publishing.
What is a content calendar?
A content calendar is a shared schedule that shows what your team will publish, when and where it will go live, and who owns each piece. It covers every channel your content strategy uses—from blog posts and email newsletters to social media, webinars, and videos.
Some teams call it a content marketing calendar. Whatever you call it, it's where your marketing plan turns into real work. The plan sets your goals, audiences, and budget, and the calendar puts dates and names on everything it takes to hit them. Most teams track each piece's status too, so anyone can see what's on track and what needs a hand.
Content calendar vs. editorial calendar vs. social media calendar
You'll see these terms used interchangeably, and that's fine. Here's how they usually differ.
An editorial calendar is a publishing schedule for editorial content, like blog posts, articles, and newsletters. It usually zooms in further than a content calendar, down to the brief, draft, edit, and approval dates behind each piece. If most of what you publish is a blog, your content calendar and editorial calendar might be the same thing.
A social media calendar narrows the focus to your social channels: the copy, assets, platform, and post time for each update.
Content calendar | Editorial calendar | Social media calendar | |
What it covers | Everything you publish, across channels | Editorial content, like blog posts, articles, and newsletters | Posts on each social platform |
What it answers | What publishes, where, and when | How each piece gets made and when it publishes | When each post goes out |
Common planning window | A rolling quarter | 4–8 weeks per piece | 1–2 weeks |
Typical owner | Content lead or marketing manager | Managing editor or content lead | Social media manager |
Level of detail | One row per piece | Briefs, drafts, reviews, and due dates for each step | Copy, assets, and post times |
Tie your social media calendar to your main content calendar, so social posts promote what's publishing that week. Our guide to building a social media planner covers the setup step by step.
Use the table to decide which layers your team needs right now. A two-person team can often run on a single content calendar with production tasks inside it.
Why teams need a content calendar
A content calendar helps your team publish on time, spread the work evenly, and catch problems before they cost you a deadline. Without one, due dates live in people's heads, and the first sign of trouble is a missed publish date.
Here's what a calendar gives you:
Clear ownership. Every piece has one owner and a due date for each step, so nothing falls between people.
Enough lead time. Reviews and design start early enough to hit the publish date.
Fewer collisions. You can see when three launches land in the same week, or when one writer has four drafts due at once.
Shared priorities. Everyone plans from the same schedule, so themes, launches, and campaigns line up.
Fewer status questions. Anyone can check what's coming without asking.
To see where you stand, list everything publishing in the next 2 weeks. Any piece missing an owner or a date is your first fix.
What to include in a content calendar
A useful content calendar includes the publish date, topic, channel, owner, and status for every piece. Start with the first seven fields in the table below, and run them for a month. As your team and volume grow, add audience and goal, target keyword, CTA, and promotion owner. Every extra field adds maintenance time, so be sure it provides real value first.
Field | What it tells the team | Where it goes in TeamGantt |
Publish date | When the piece goes live | Publish milestone |
Topic or working title | What the piece covers | Task group name |
Content type and channel | The format and where it publishes | Dropdown custom fields |
Owner | Who's responsible for getting it live | Task assignee |
Status | Where the piece sits in production | Board view columns or a dropdown custom field |
Production deadlines | When the draft, review, and design are due | Task end dates |
Drafts and assets | Relevant files and where to find them | Task notes or file attachments |
Audience and goal | Who it's for and what it should achieve | Task notes |
Target keyword | The search term the piece targets | Text custom field |
Call to action (CTA) | The next step you want readers to take | Task notes |
Promotion owner | Who shares the piece after it goes live | Promotion task assignee |
How to create a content calendar
Building a content calendar involves 7 basic steps: set your goals, pick your channels, gather ideas, align content plans with lead time, schedule backward from each publish date, assign owners, and track status. The first few steps decide what you'll publish. The rest make sure it ships on time.
1. Set goals tied to your marketing plan
Every piece on your calendar should support a goal from your marketing plan. Pick 2–3 goals for the quarter, such as growing newsletter signups or supporting a product launch. Then tag each planned piece with the goal it serves.
Move any piece that doesn't map to a goal into your backlog.
2. Choose your channels and cadence
Your channels and cadence decide how much work the calendar has to hold. You might post to social several times a day, publish a blog article once a week, and send a newsletter once a month.
Before you lock it in, look at who's doing the work. If the same writer owns the blog and the newsletter, those deadlines will pile up in the same weeks. Set each channel's cadence so the overlap stays manageable for a full quarter.
3. Brainstorm themes and keep a backlog
Hold a brainstorm once a quarter to set themes and generate topic ideas across all your channels. Planning them together makes it easier to connect blog posts, emails, and videos and gives you a pool of ideas to draw from all quarter.
Got great ideas that don't have a place in the schedule right now? Keep a backlog, and review it at each brainstorm so strong ideas get a slot.
4. Align content plans with lead time
A newsletter might only need a couple of weeks of lead time since it features content you're publishing that month. A webinar, on the other hand, should land on the calendar much earlier so you have time to promote it before the big event. Give each format the lead time it actually needs.
Content type | Commit it |
White papers and reports | 8–12 weeks out |
Webinars | 6–8 weeks out |
Long-form, like blog posts and guides | 4–8 weeks out |
Video | 4–6 weeks out |
Newsletters | 2–4 weeks out |
Social posts | 1–2 weeks out |
Pull the next batch of pieces from your backlog at the start of each month. Your quarterly brainstorm keeps the themes fresh.
5. Schedule publish dates and work backward
Publish dates anchor the calendar, and every other task flows backward from them. Assign each new piece a publish date. Then work your way back on the calendar to establish a timeline.
Assign the tasks and milestones your team will need to complete so every piece is ready to publish on time. If a review runs long, everything after it shifts too. Add a day or two of buffer before each publish date, so one late handoff doesn't knock everything else over.
Once a piece is on the calendar, leave its topic and publish date alone. Changing them midstream creates a moving target for writers and reviewers, so save changes for anything truly urgent.
6. Assign owners and set review rules
Every piece needs one owner who's accountable for getting it live, even when several people touch it. Reviews are where content calendars often stall. Set clear guidelines with stakeholders ahead of time so they know how many revision cycles to expect and when you need their approval.
A simple default is two review rounds with a 2-business-day turnaround for each. Put those reviews on the calendar as dated tasks so reviewers see their deadlines next to the writer's.
Freelancers and outside reviewers need the same dates your internal team sees. Share each person's due dates when you assign the piece, and confirm they're available for the review window. If a subject-matter expert (SME) is booked that week, line up a backup reviewer before the draft lands.
If several people weigh in on each piece, a RACI chart spells out who does the work, who signs off, who gives input, and who just needs a heads-up.
7. Track status and keep the calendar current
A good status tells your team two things at a glance: where a piece is and what it's waiting on. Stick to a handful of status stages, and use the same set for every piece. Here are a few you might start with:
Status | What it means |
In development | The writer is drafting the content. |
Ready for review | The first draft is complete. |
In revision | Feedback is in, and changes are underway. |
Approved | Final content is ready to publish. |
Live | The piece is published. |
Update the status as soon as a piece moves forward, so nobody has to ask where it stands.
Content calendar examples
Different people need different things from your content calendar. Leadership wants to know what's publishing and when. Stakeholders want to see how things are progressing. And your content team needs to manage the deadlines and handoffs behind every piece.
Here are 3 ways to view the same content calendar in TeamGantt, using a sample architecture and design publication.
Monthly content calendar: See what's publishing
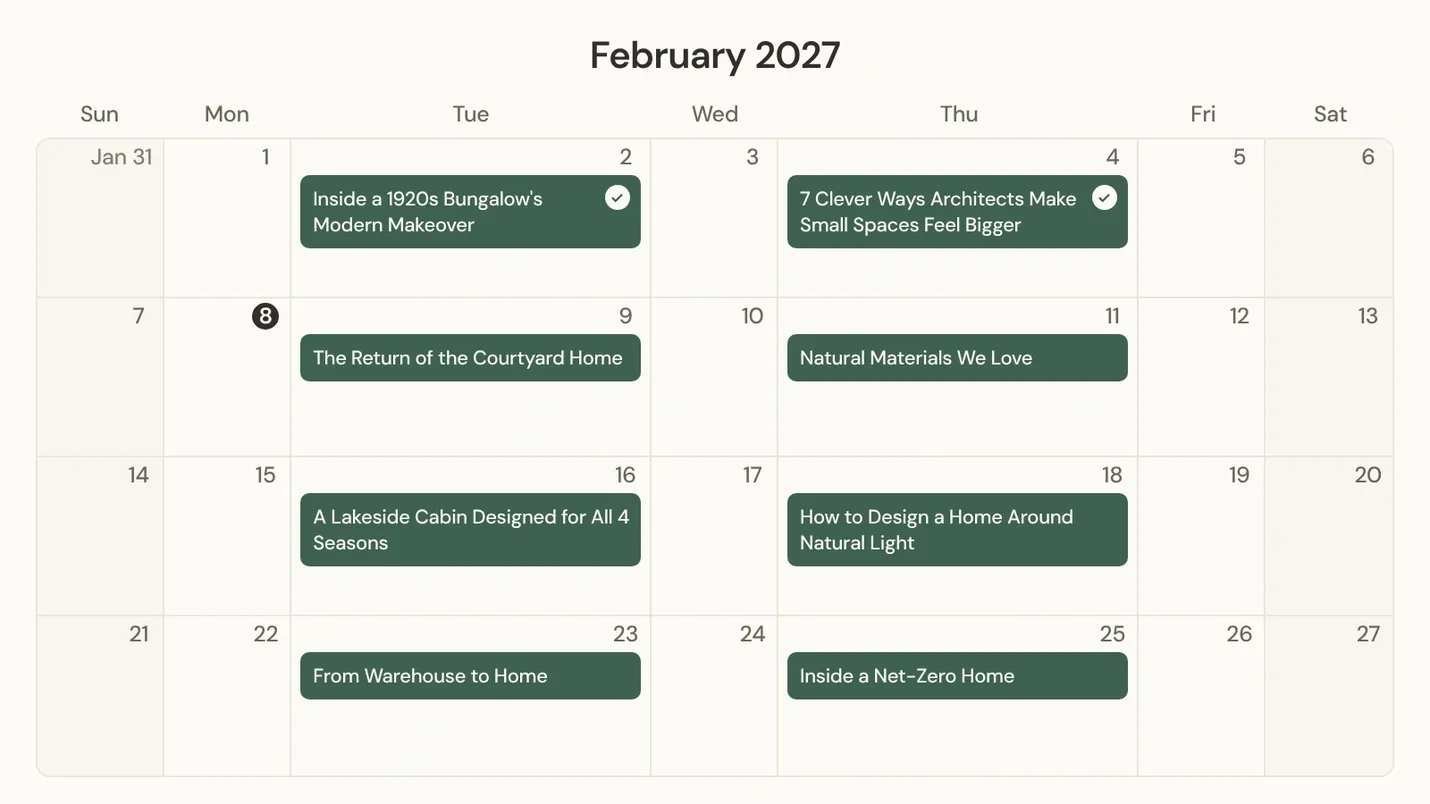
A monthly content calendar gives leadership a quick look at what's scheduled to go live. In this example, an architecture and design publication plans to publish 2 new stories each week, on Tuesdays and Thursdays.
Filter Calendar view to show only committed topics, keeping production details out of the picture. In this example, the topics live in their own task group with a shared task color, so filtering by that color shows just the topic names. Use this view in planning meetings to review publishing cadence, spot gaps, and check progress against upcoming deadlines.
Content status board: Track editorial progress
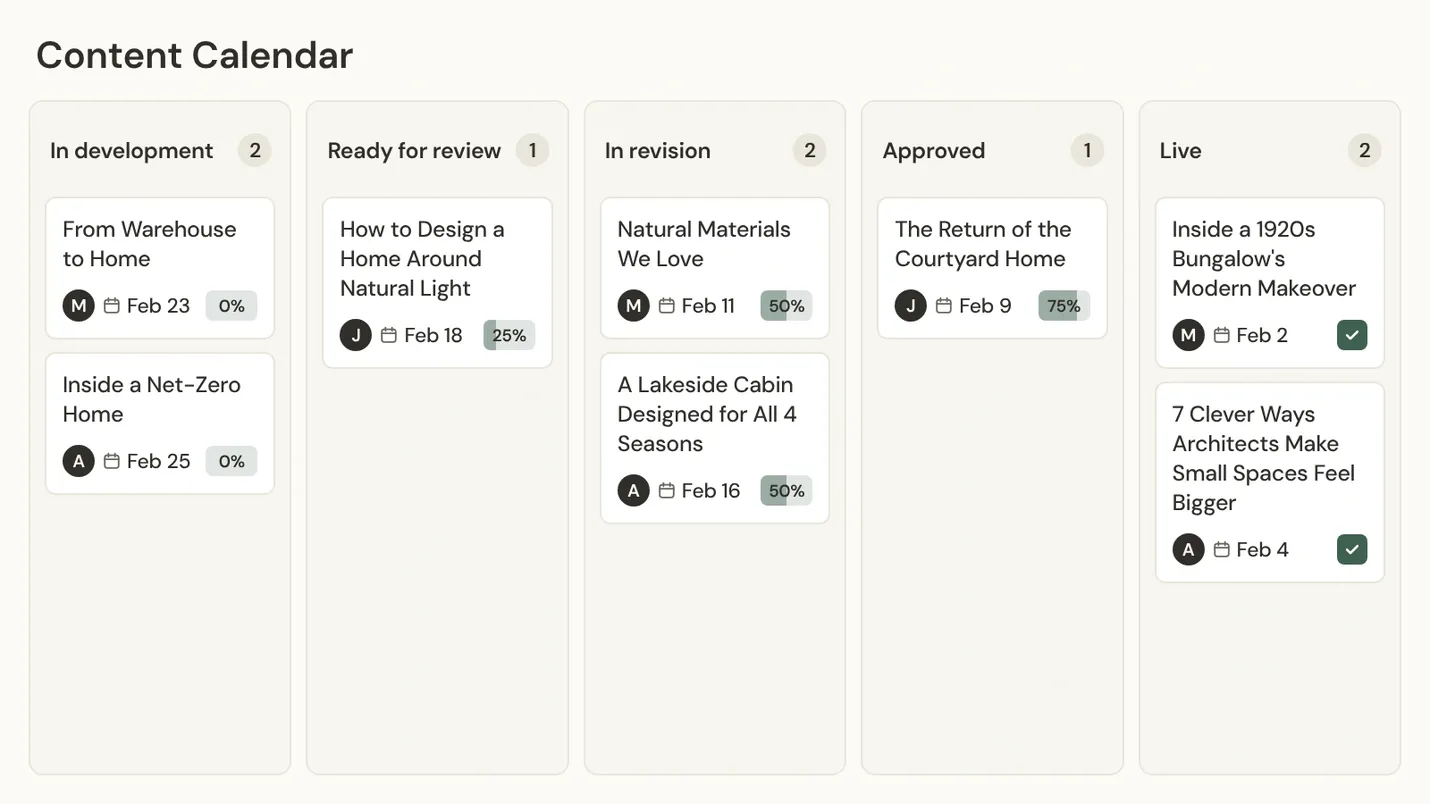
A content status board shows where each piece stands in production. Here, the same committed topics, filtered by the same task color, are organized into 5 statuses: In development, Ready for review, In revision, Approved, and Live.
Use Board view in weekly editorial meetings or stakeholder check-ins to see what's on track, what's waiting on review, and what's ready to publish—without digging into individual production schedules.
Blog production timeline: Manage deadlines and handoffs
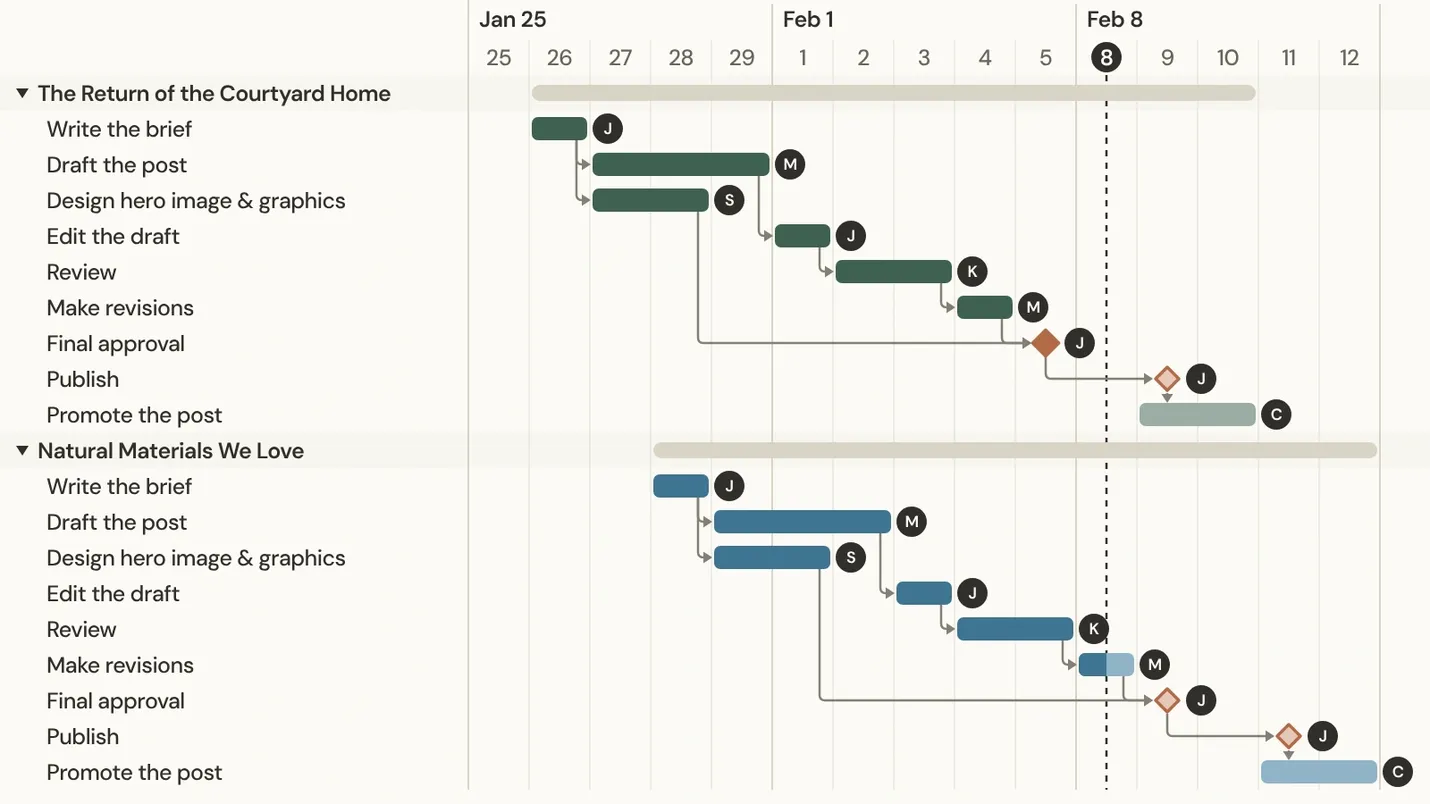
A blog production timeline maps out the work behind each publish date. In this Gantt chart example, every article has its own production schedule, with tasks for writing, editing, design, approval, publishing, and promotion.
Each task has an assigned owner and deadline, while dependencies show how the work connects. If a draft runs late, you can see which tasks are affected and adjust the schedule before the publish date slips.
In this example, each article takes about 2–3 weeks from brief to publish: a day for the brief, 3–4 days to draft, 1–2 days to edit, 2–3 days for review, then revisions and final approval, with design running alongside the draft.
 Once you’ve mapped out your production workflow, save it as a template so every new post starts from the same structure.
How to choose a content calendar tool
There's no single right tool for scheduling your content. You can successfully use an Excel spreadsheet or Google Doc, Kanban board, online calendar, or any other planning tool and method out there. The most important thing is to write the plan down somewhere your whole team can see it.
Each option handles timing a little differently:
Spreadsheet: Best when one person owns a short list of pieces. Excel or Google Sheets handles lists and fields well, but it struggles to show what shifts when one date moves.
Online calendar: Best when you mainly need to see what's going live and when. It shows publish dates clearly but hides the production tasks behind each date.
Kanban board: Best when your team moves pieces through stages and wants to spot what's stuck. It makes status easy to scan but doesn’t show timing or sequence.
Gantt chart: Best when your content depends on handoffs between writers, editors, reviewers, and designers. It shows tasks, owners, and dates on one timeline, plus which tasks depend on each other.
You don't always have to choose. Some tools, like TeamGantt, let you switch between a Gantt chart, calendar, and board without rebuilding the plan. That way, each person can use the workflow that suits them best.
How to build a content calendar in TeamGantt
A Gantt chart puts each piece's production tasks on one timeline, so you can see what's late and what it affects. Here's how to set one up in TeamGantt:
Start from a template. Open the content calendar template or blog content calendar template to skip the blank-page setup.
Set up your fields. Add dropdown custom fields for content type, channel, and goal. Track status with Board view columns or with a dropdown custom field for Gantt view.
Add each piece as a task group. List its production tasks, like the brief, draft, edit, review, and design, and give each one an owner and a due date.
Link tasks with dependencies. That way, review can't start until the draft is done. When you drag a task to a new date, its dependent tasks move with it, so one late draft shows exactly which dates shift.
Mark milestones. Set final approval and publish dates as milestones, so they stand out on the timeline.
Clarify who does what. If more than one person reviews each piece, use the built-in RACI chart to show who does the work, who signs off, and who just needs to stay in the loop.
Copy the workflow for the next piece. Once one piece is set up, copy its task group and adjust the dates.
Switch views as you work. Use Gantt view to manage sequence and handoffs, Calendar view to see publish dates by month, and Board view to track each piece's status at a glance.
New to Gantt charts? Read our guide on what a Gantt chart is and how it works.
Best practices for keeping your content calendar on track
Most content calendars don't fall apart on day one. They drift: a review runs late, a new request jumps the line, and by week six the plan no longer matches reality. These habits keep yours on track.
Plan around real capacity
Capacity is where many content calendars break down. In a 2026 report by Content Marketing Institute and MarketingProfs, 39% of B2B marketers named resource constraints—like time, people, or budget—as a top-three challenge.
Plan capacity in hours per piece. Say a 1,500-word post takes a writer about a day to draft, plus a couple of hours for revisions. If they have 20 content hours a week, two posts is their ceiling before anything else lands.
Before you commit a new piece, check the Workloads view in TeamGantt. It shows each person's tasks or hours by day across all your projects, so you can see who's already stacked.
Run a weekly 15-minute review
A short weekly review keeps the calendar current without adding another long meeting. Walk through the next 2 weeks and ask 3 questions: what changed, what it affects, and who needs to know today.
Saving a schedule baseline when you finalize each month's plan makes that first question easy to answer. You can save several and name each one, like "March plan" or "Launch moved," so you always have a record of what shifted and why.
End the review by confirming owners and due dates for everything publishing in that window.
Recover when the calendar stalls
Calendars stall when work piles up faster than the team can finish it. When that happens, use these moves in order:
Cut scope by shortening a piece or splitting it into two.
Move lower-priority publish dates out a week or two.
Protect milestones tied to launches, campaigns, or outside commitments.
Tell stakeholders what moved and why. Nobody should learn about a missing post after the fact.
Plan promotion, repurposing, and refreshes
Hitting publish is only half the job. The other half is getting your content in front of the people it was made for. Give every piece a promotion task with its own owner and date.
Reserve one slot a month for repurposing a strong piece into a new format or refreshing an older article. Those slots also give you buffer when a new piece runs late.
Measure the calendar itself
Track two kinds of results: how well the calendar runs and how well the content performs. Three numbers show calendar health:
Planned vs. published: how many of the month's planned pieces actually went live (your publish rate)
On time: how many went live on their scheduled date
Turnaround: how many days a piece takes from brief to publish (your cycle time)
Review these numbers monthly. Use what you learn to adjust next month's cadence and lead times.
Content calendar templates in TeamGantt
We built two templates so you can start with a working structure instead of a blank page. Both open in TeamGantt, where you can rename tasks, set your own dates, and assign owners. Try either one free for 14 days (credit card required).
The content calendar template plans a full quarter across channels, with goal-setting, a topic backlog, sample blog, email, social, video, and webinar workflows, and weekly and monthly reviews built in.
The blog content calendar template follows the blog production workflow for each post, from brief and draft through review, SEO check, publishing, and promotion, plus monthly refresh slots.
Pick the content calendar template if you publish across several channels. Pick the blog content calendar template if blog posts make up most of your production.