A website development plan, also called a website project plan, is the schedule of phases, tasks, owners, and approvals that takes a website build or redesign from discovery to launch and upkeep. It shows who does what, in what order, and which handoffs each step depends on.
Writers, designers, and developers hand work to each other at every stage, so one late deliverable can stall everything behind it. This guide shows you how to build a plan that keeps those handoffs on track.
Developing a website? Here’s why you need a project plan
A website project plan prevents the delays that come from unclear deadlines, dependencies, and scope. Under pressure to deliver quickly, teams often jump into a build, migration, or redesign before thinking through the details.
Website projects involve multidisciplinary teams and complex scopes of work. Content feeds design, and design feeds development. Late copy is usually where that chain breaks first, because designers can’t finalize layouts and developers can’t build pages around placeholder text.
Without one shared plan, writers, designers, and developers end up redoing work, and nothing keeps scope creep from wrecking your timeline.
However busy your team or eager your stakeholders are, the time it takes to build a clear plan pays for itself in fewer revisions and an on-time launch. For more on why planning matters, see our project planning guide.
Website development process checklist
A website development plan typically moves through 7 phases, and you can adjust each one to the timing and scale of the project. Each phase hands its output to the next, so the order below doubles as your task sequence.
1. Project definition and discovery
The discovery phase lays the groundwork for everything that follows. Use it to set a clear vision and scope for your site while learning as much as you can about your users and competitors.
The project manager usually owns discovery, with stakeholders signing off on goals, budget, and requirements before kickoff. Work through these steps to start your web design project off right.
Set clear website goals. Everyone involved in the website project should know why it’s being created or redesigned. Define the overarching goals (e.g., sales growth, lead generation, community education) and what actions you want visitors to take. Those goals inform content and design and keep the team focused on the results you need.
Formulate a budget. A budget sets clear parameters around the scope of the project. It helps you make smart decisions about what features to include, where to spend your project time, and when to call in reinforcement from third-party resources.
Do a competitive analysis. Understand the landscape of options your customers have at their fingertips. Research competitor websites, and pay attention to the story they tell and how they meet customer needs. Look for opportunities to set your brand apart and turn first-time visitors into lifelong customers.
Conduct user research. Include users in the discovery phase of your website project. Develop buyer personas and customer journey maps to understand your audience better. Run usability testing to see how people interact with your current site (or competitor sites if you’re building a new one from scratch), and use those findings to guide your content and design strategies.
Document project requirements. Project requirements define what your website should do or include. Work closely with your stakeholders to spell out the features, functions, and tasks that need to be completed to deliver a win. Capturing these details before work begins goes a long way toward avoiding delays and discontent later.
Establish your project team and roles. Burnout drags down productivity. Figure out who has the bandwidth to do the work on time, and what role they’ll play, before you start handing out assignments. Use a RACI chart to define roles and responsibilities so there’s no confusion about who’s doing what once work gets underway.
Kick off the project. Your team and stakeholders should be on board with the plan before it’s locked in. Get everyone together to review the timeline and requirements, and leave room for feedback.
2. Content strategy & architecture
Content gives voice to your brand and sets a foundation for building trust with your audience. Put content due dates on the schedule ahead of the design tasks that depend on them, and assign each page or content group to a named writer. These steps help you structure and write content that keeps users engaged and moves you toward your website goals.
Gather and assess content. Before you put words to pixels, take time to catalog existing content and research SEO opportunities. Then work with stakeholders to identify gaps and determine what needs to be created. Use this step to get up to speed on the brand voice and style, too.
Create a sitemap. Next, plan how content will be structured and organized on your website. A sitemap outlines all the pages on your site and how they relate to each other. A sitemap helps Google know how to crawl your site, and it gives you a basic framework for building content out page by page.
Write content. Digital attention spans are short, so keep messaging clear, simple, and concise. Your audience should always be the focus of your content. Build content around their needs and desires, and help users find their way from problem to solution quickly.
Establish a process for upkeep. Web content can go stale fast. Map out a process for keeping it fresh and compliant once your site goes live. With that process in place, there’s no confusion about who’s in charge of updates.
3. Visual design & prototyping
Content begins before design and even informs it, but the two phases typically overlap. Have writers and designers work in tandem so content and design align closely to deliver a positive user experience. Add a project milestone for stakeholder sign-off on the prototype, with a named approver, so the handoff to development has a fixed date.
Create a mood board. A mood board captures the visual elements of your design concept and may include colors, fonts, branding, and image styles. Use this collage to communicate your general vision to stakeholders and get buy-in on the look and feel of the website before going all-in on design.
Build out a wireframe. Give shape to the user experience by sketching out how content will be structured on your web pages at a high level. Wireframes help further define content needs and give you another tool for securing stakeholder buy-in early in the design phase.
Design a mockup or prototype. Once you’ve nailed down your design direction, bring your vision to life by designing a prototype. Loop developers in on your mockup so you’re aware of any technical limitations that might affect design. Make sure stakeholders sign off on your prototype before you hand your final design off to the dev team for build-out.
4. Website build & development
Development is where your content and design come together into a functional website. Many web developers use the Agile methodology to get work done. You can build sprints into your Gantt chart or set up a Kanban board for your project so your process aligns with their preferred workflow.
Ask your developers which front-end and back-end tasks can run in parallel, and schedule those side by side instead of end to end.
Front-end development. Front-end work is all about delivering a smooth experience for users. Front-end developers apply the visual styles to content and pages and add interactive functionality to the site, like video, animation, and navigation menus. They also make sure your website meets accessibility standards and is responsive across devices.
Back-end development. Back-end developers handle server-side programming for the website. Their work may include creating and managing databases, coding the business logic, and connecting the front-end site to back-end systems or external services. Not all websites will require back-end infrastructure.
5. Final site review & QA testing
Final review and QA are the last steps before launch. Do one last check to clean up copy, test buttons and forms, and make sure your website looks good on multiple devices. Group QA tasks under one owner on the schedule so every fix routes back to the right person before launch.
Use this pre-launch checklist to build out your QA task group:
Test key pages on the browsers and devices your audience uses.
Submit every form, and confirm entries reach the right inbox or system.
Click through navigation and in-page links to catch broken URLs.
Check headings, alt text, color contrast, and keyboard navigation for accessibility.
Confirm analytics tracking records visits and conversions on key pages.
Test redirects from old URLs if you’re replacing an existing site.
6. Website launch & promotion
Launch is when your team deploys the new website and promotes it across all your marketing channels. Set launch day as a milestone with one owner who makes the go/no-go call and coordinates the deploy. Once the site is live, rally the team behind promotion, and celebrate this major milestone together.
7. Maintenance & monitoring
Maintenance keeps your website current long after launch. Determine how you’ll measure performance and how you’ll handle site maintenance and feature additions over time. Name an owner for monitoring and put a recurring review on the calendar, such as monthly, so your website keeps up with industry trends and customer needs as they evolve.
Why website projects slip and how to plan around them
Website projects usually slip at the handoffs: content to design, design to development, and draft to approval. Each cause below comes with the scheduling move that keeps it from stalling launch.
Late content. Make copy and asset due dates predecessors to the design and build tasks that need them. A content delay then shows up on the schedule before it reaches your developers.
Slow approvals. Schedule each approval as a milestone with a named approver and a set review window. A clear project review and approval process sets turnaround expectations before the first draft goes out.
Scope additions. Route every new page, feature, or integration through the plan before anyone starts work. Add and link the new tasks, then show stakeholders the revised launch date before they approve the change.
Overloaded people. Confirm each person’s bandwidth across all their projects before you assign tasks. One designer booked on three active projects can hold up all three.
Task dependencies show which work has to happen before the next task can begin. If homepage copy arrives three days late, design and development may need to move too. Check the critical path—the chain of dependent tasks that determines your earliest launch date—to see whether that delay pushes launch or fits within the time available.
Once you know what’s affected, you can choose how to respond. Could design start with approved copy while the remaining sections are finalized? Could a lower-priority feature wait until after launch? If the work can’t shift, share the revised launch date with stakeholders while there’s still time to adjust their plans.
Website project plan example and templates
You’ve outlined the seven phases. Now put them on a timeline so your team knows who’s doing what and when.
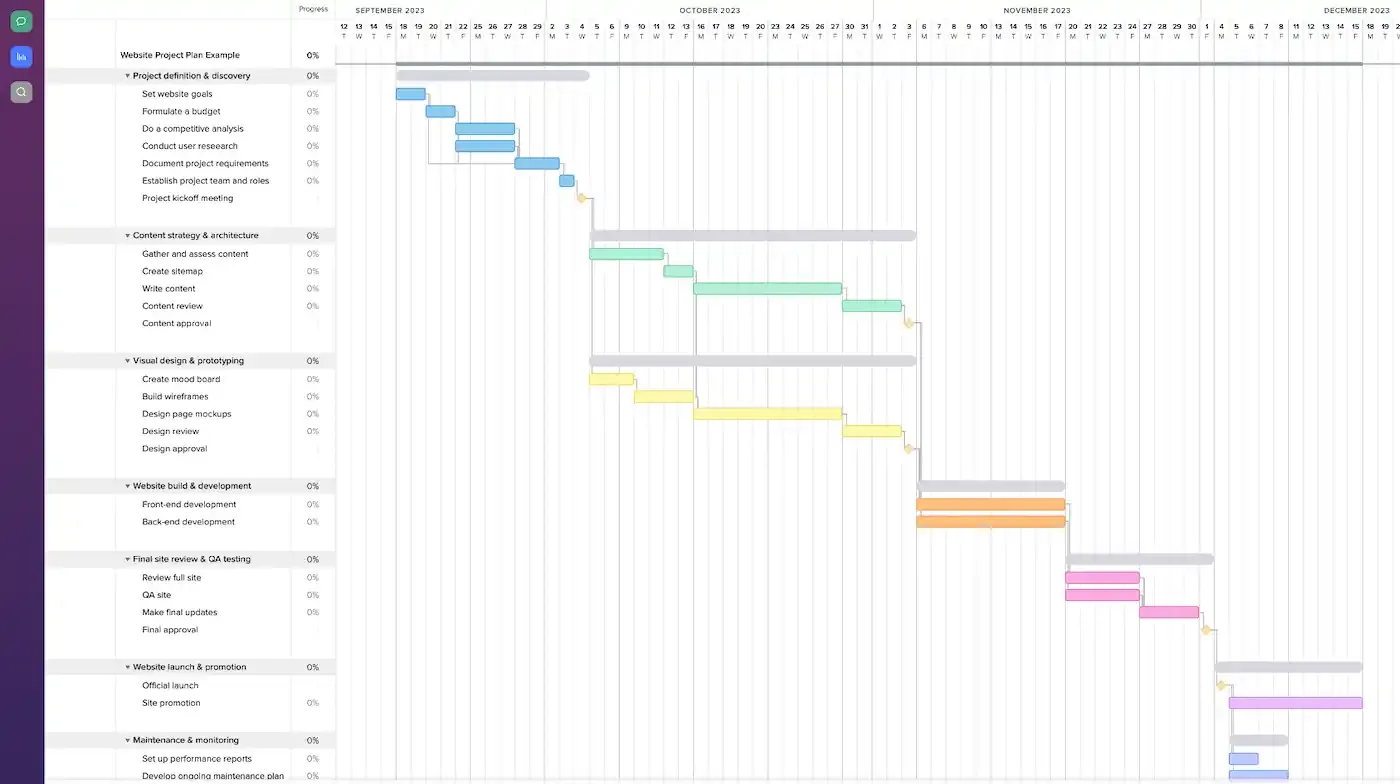
Website development Gantt chart example
A Gantt chart shows when each task starts and ends, where work overlaps, and which tasks depend on others. Here’s how a website development plan looks in TeamGantt:
Website project plan templates
Start with a template, then adjust the tasks, owners, and dates to fit your project:
Website development plan template: Plan your website project from the first phase through launch.
Multimedia web development template: Include photography and video production tasks alongside the rest of your website work.
Try either template in TeamGantt with a 14-day free trial.
How to use TeamGantt to manage your website project plan
Once work begins, TeamGantt keeps your plan, handoffs, and team updates on one timeline:
Link handoffs with dependencies. When you drag a task to a new date, its dependent tasks move with it. Use finish-to-start when design waits on final copy, and start-to-start when front-end and back-end work run in parallel.
Mark approvals and launch with milestones. Give each milestone a clear approver so reviews stay visible on the timeline.
Ask your team to update percent complete as they work, so you spend less time chasing status. Invite freelancers as collaborators, and they’ll see only the projects you add them to.
Keep notes, files, and approvals on each task. Attach the creative brief, drafts, and mockups to the task, and tag reviewers in comments.
Switch views for different needs. Use Board view to give teammates a Kanban workflow with your own columns. List view works for standups, and Calendar view shows how tasks stack up across multiple projects.
Check Workloads before you assign work. It shows how many tasks each person has on each day across all active projects, so you can spot overloaded teammates before you hand out work.