Project scheduling is the process of turning a project plan into a dated timeline of tasks and milestones. The finished project schedule shows who owns each task and when it’s due, so anyone can read the order of work at a glance.
This guide walks you through building a project schedule step by step, then keeping it current when work slips.
What is a project schedule?
A project schedule is a timeline of every task in a project, who owns it, and when it starts and ends. It’s the plan your team works from day to day, and the one you share when someone asks when the work will be done.
Whether it lives in a spreadsheet or a Gantt chart, every project schedule includes the same core parts:
Tasks that break each deliverable into doable work
Durations for how long each task takes
Start and end dates on a shared calendar
Sequence and dependencies that set the order of work
Owners who are responsible for each task
Milestones that mark key approvals and deadlines
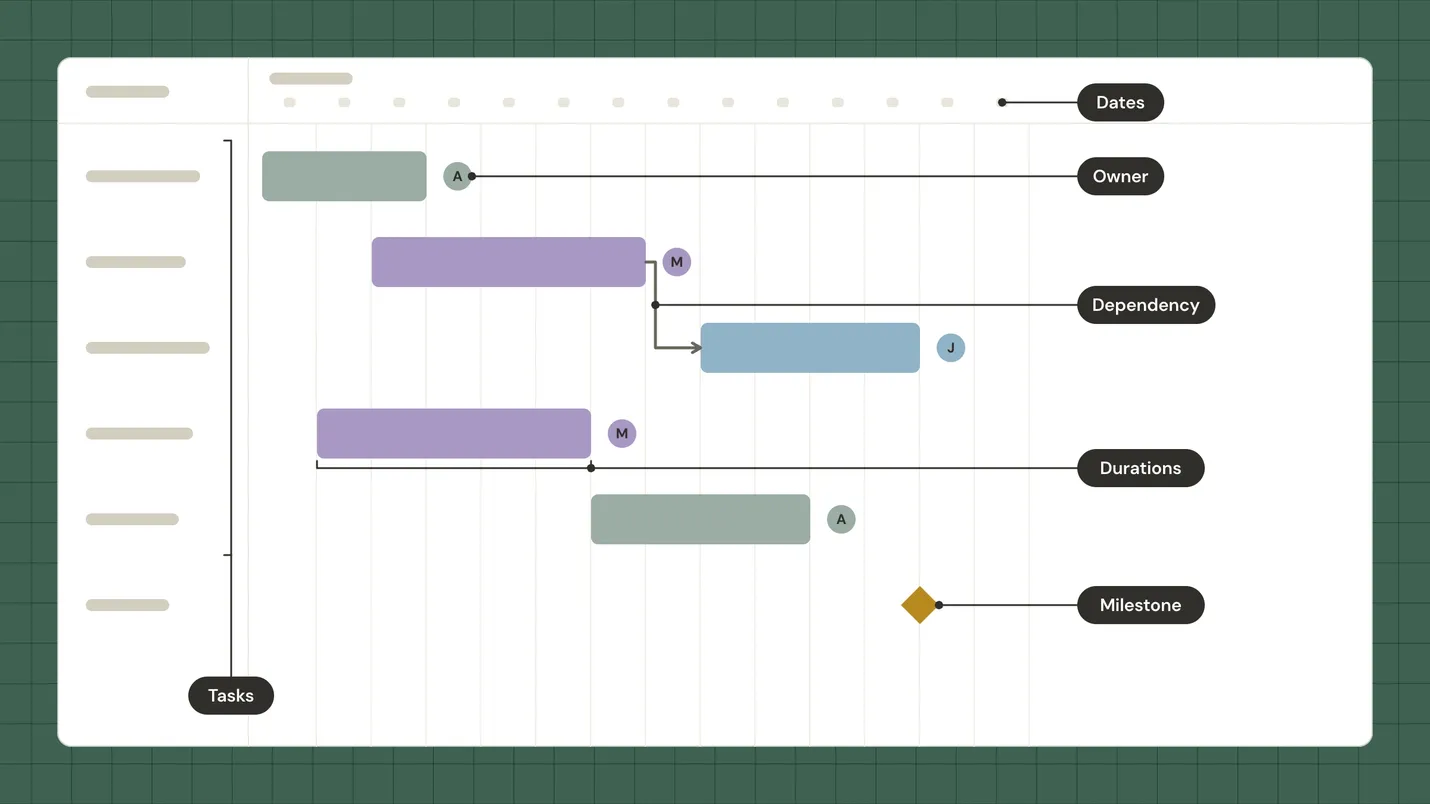 When one of these parts is missing, the schedule can’t answer the question people ask most: What happens next?
Project schedule vs. project plan vs. project timeline
A project schedule is the time-based part of a larger project plan. The project plan covers how the whole project will run, including scope and budget. The schedule answers a narrower question: Who does what, and by when?
A project timeline is a simpler view of the same schedule: the phases and key dates you’d show at a kickoff. The schedule holds the task-level detail behind it, like owners, durations, and dependencies.
Types of project schedules
Project schedules come in four common levels of detail, and each one serves a different reader. Here’s how they differ:
A milestone schedule shows only the key dates, like approvals and launch.
A master schedule summarizes the whole project by phase, usually on one page.
A detailed schedule lists every task with its owner and dependencies.
A look-ahead schedule zooms in on the next 2–6 weeks of near-term work.
Build the detailed schedule first, then roll the other views up from it. Stakeholders usually want the milestone view, while the team works from the detailed one. Keeping every view in one source means nobody maintains two versions that fall out of sync.
How to create a project schedule in 7 steps
These 7 steps help you catch missing work, unrealistic dates, and double-booked teammates before work starts. The steps work the same way in a spreadsheet or a Gantt chart, so start with whichever tool you have open.
1. Define deliverables and scope
Scope defines what “done” means, so settle it before you set a single date. List the deliverables the project must produce, like a published pricing page or a signed vendor contract. Then break each deliverable into smaller pieces with a work breakdown structure (WBS), which is a tree of deliverables and the work under them.
Skipping this step is how surprise work shows up in week four. If a deliverable isn’t on the list, nobody plans time for it.
2. Break deliverables into tasks
A good task has one owner and a clear finish line. Name each task with a verb and a noun, like “Draft launch email” or “Test checkout flow,” so anyone can tell when it’s done. Split any task that’s too big to estimate with confidence.
Vague tasks are where handoffs fail. A task called “Website” never quite finishes, while “Publish pricing page” has an obvious end that the next person can act on.
3. Estimate durations
The most reliable duration estimates come from the person who’ll do the work. Ask them how many working days the task takes, then compare their answer to similar tasks on past projects. Our project estimation guide covers more methods if you’re starting from scratch.
Add buffer only to the risky tasks. Padding everything stretches the timeline and hides where the real uncertainty sits. A task waiting on an outside approval deserves extra days, while a routine task your team has done many times usually doesn’t.
4. Sequence tasks and set dependencies
A dependency is a link that shows which task can’t start or finish until another one does. Dependencies turn a task list into a schedule because they show what moves when a date changes. Four dependency types cover nearly every situation:
Finish-to-start means a task starts after the one before it finishes, and it’s the default you’ll use most.
Start-to-start means the dependent task can start once the first task has started, like copywriting that begins once design is underway.
Finish-to-finish means the dependent task can finish once the first task has finished, like testing that wraps up after development does.
Start-to-finish means a task can’t finish until another starts, like an old tool that stays live until the new one launches.
Add a dependency only when one task’s timing truly controls another’s. Dependencies added “just in case” make every small change ripple through the plan. Once that happens a few times, the team stops trusting the dates.
5. Assign owners and check workload
Every task needs a clear owner. Several people can contribute, but name one person who confirms the task is done and tells the next person it’s ready.
Before you commit to dates, check whether anyone is booked on too many overlapping tasks. If someone is double-booked, reassign a task or shift its dates now, while the change is cheap.
6. Add milestones
A project milestone marks a key approval, handoff, or deadline. It has no duration, since it marks a checkpoint, not a stretch of work. Milestones give stakeholders clear status checks without asking them to read every task. Good candidates include:
Approvals and sign-offs
Handoffs between teams
Launch or go-live dates
External deadlines you don’t control
7. Review, share, and save a baseline
A schedule is ready when the people doing the work agree the dates are realistic. Walk through it with the team task by task, and fix anything that doesn’t match how the work really happens.
Then share a single version that everyone works from. Email attachments create copies, and copies drift.
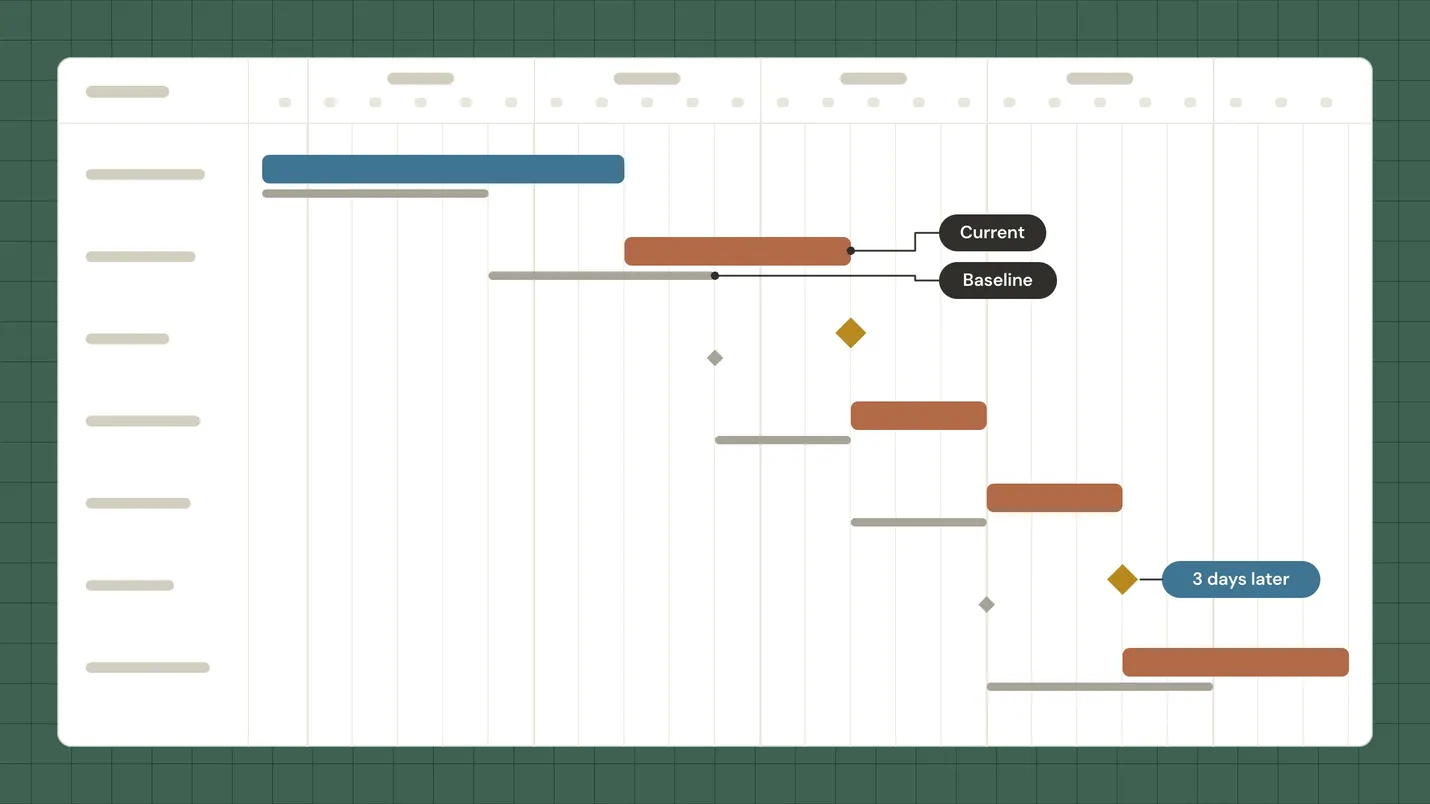
Finally, save a schedule baseline before work starts. A baseline is a snapshot of your approved plan, so you can measure what changed later and explain why.
Project scheduling techniques
Project scheduling techniques are methods for setting and protecting dates, and you’ll usually combine a few. The right mix depends on how certain your durations are and how fixed your deadline is.
Technique | What it does | Best when |
Gantt chart | Shows tasks as bars on a timeline, with dependencies between them | Everyone needs to read the plan at a glance |
Critical path method (CPM) | Traces the longest chain of dependent tasks, which sets the finish date | The deadline is fixed and late tasks are costly |
PERT (three-point estimating) | Blends three estimates per task into one weighted duration | Durations are uncertain or the work is new to the team |
Rolling wave planning | Plans near-term work in detail and later phases in outline | Later phases depend on what you learn early |
Critical chain | Accounts for limited resources and uses shared time buffers to protect the finish date | Tasks compete for the same people or equipment, and durations are uncertain |
Resource leveling | Shifts tasks so no one is booked beyond capacity | The same few people work across several projects |
Schedule compression | Shortens the timeline by overlapping tasks (fast-tracking) or adding people (crashing) | You must pull in a date and can accept more risk or cost |
Most teams only need two or three of these. Track the critical path when a late task would move your finish date. Save three-point estimates for your riskiest tasks, where you have little past work to base estimates on. And when later tasks depend on decisions you haven’t made yet, plan them as rolling waves, adding detail a few weeks out.
Project scheduling examples
These two examples show how a project schedule helps you make decisions: what needs to move when a task slips and what needs to happen now to keep upcoming work on track.
Software rollout: A 6-week schedule with one slip
A worked example makes the critical path easy to see. Here’s a 6-week schedule for rolling out a new help desk tool to an internal support team, measured in working days.
Task | Owner | Duration | Depends on | Working days |
Confirm requirements | Operations lead | 3 days | None | 1–3 |
Configure the help desk tool | IT admin | 6 days | Confirm requirements | 4–9 |
Write training guides | Operations lead | 6 days | Confirm requirements | 4–9 |
Migrate existing tickets | IT admin | 5 days | Configure the help desk tool | 10–14 |
Run a pilot with one team | Support manager | 5 days | Migrate existing tickets; Write training guides | 15–19 |
Pilot sign-off (milestone) | Support manager | 0 days | Run a pilot with one team | 19 |
Fix pilot issues | IT admin | 3 days | Pilot sign-off | 20–22 |
Train all support staff | Operations lead | 3 days | Fix pilot issues | 23–25 |
Go-live (milestone) | Operations lead | 0 days | Train all support staff | 25 |
Collect feedback and adjust | Support manager | 5 days | Go-live | 26–30 |
The critical path runs through every task except the training guides. Those guides have 5 days of float, which is the time a task can slip before it delays anything else.
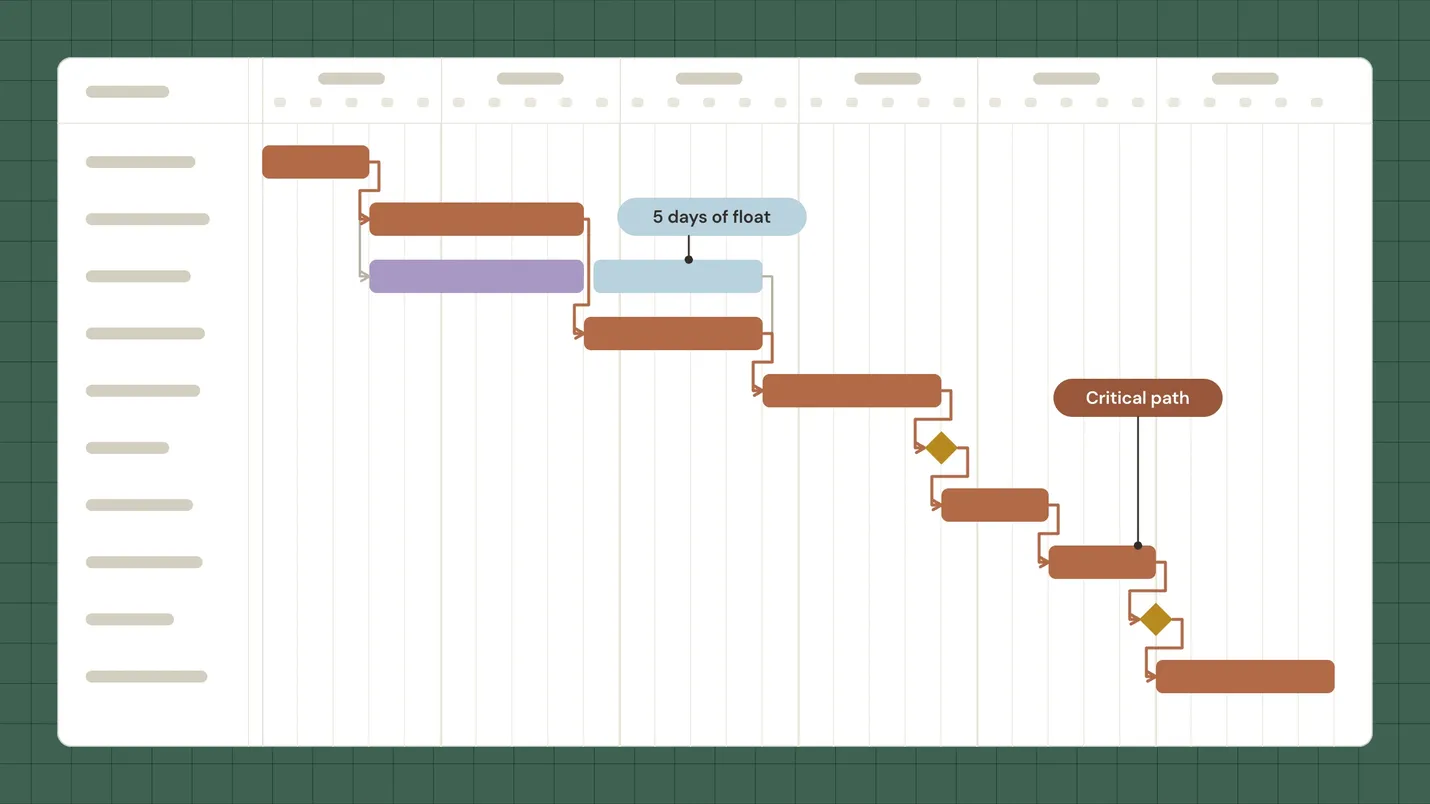 Now say ticket migration slips 3 days. Here’s what that one change affects:
The pilot starts on day 18 instead of day 15
Pilot sign-off moves from day 19 to day 22
Go-live moves from day 25 to day 28
Feedback collection ends on day 33, past the 6-week window
If the training guides slip 3 days instead, nothing else moves. They’d finish on day 12, still ahead of the pilot on day 15. The training guides can slip 5 working days without delaying the pilot. A longer delay would push the pilot and the project finish date.
Construction: A 2-week lookahead
If rough-in runs late, the inspection and drywall dates may need to move too. Put those handoffs on the schedule so the next trade knows when the site will be ready.
A 2-week look-ahead keeps a construction schedule tied to the work that’s coming next. Picture a kitchen remodel where demolition and rough-in fill the next two weeks. The look-ahead also holds one task that’s easy to miss: approving the custom cabinet order.
Custom cabinets are a long-lead item, so the order has to go in weeks before install. Put that lead time on the schedule as its own bar, ending right before the cabinet install task it supports. If the order goes in late, the lead-time bar pushes past the install date, so you see the conflict as soon as it happens, not on install day.
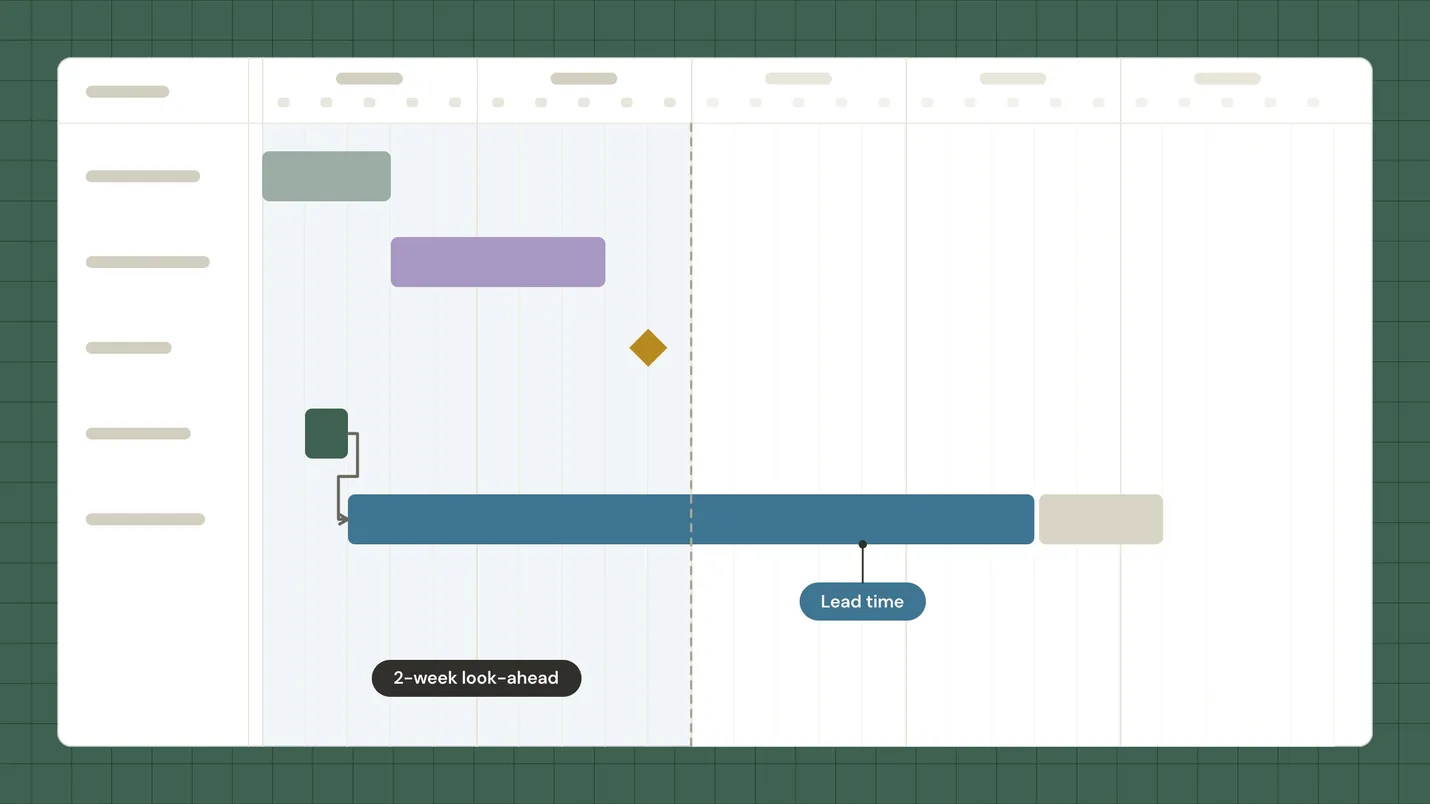 In TeamGantt Builder Edition, lookaheads filter the schedule to a 2–6 week window. Material lead time tracking lets you see each order alongside the task it supports.
The same rule works for any team. Any input with a lead time, like a vendor contract or a legal review, belongs on the schedule before the task that needs it.
If you’re looking for a jumping off point, check out our construction schedule example or download even more construction project management templates.
How to keep a project schedule on track when work slips
A task runs late. An approval takes longer than expected. Before long, the dates on your schedule don’t match the work. That's why it's important to set aside time each week to update progress and review what’s changed, then share the latest schedule with your team. Here’s a simple routine to follow:
Update progress at the same time each week. Mark finished work and adjust dates for anything in progress.
Log every change in three parts: what changed, why it changed, and what it affects.
Check the critical path and the next milestone first. Those dates tell you whether the finish date is at risk.
Re-share the one live version instead of sending a new file. Weekly attachments mean someone is always reading last week’s plan.
Save a new, named baseline when scope or the agreed deadline changes. For everyday slips, keep comparing against the approved plan, so the drift stays visible.
Keeping one live version is harder in a spreadsheet, because every emailed copy becomes its own version. In TeamGantt, every baseline you save stays available, so you can compare the current plan against any of them. A view-only share link lets stakeholders see the current plan without waiting for a new file.
How to use our Excel project schedule template
Download TeamGantt’s free project scheduling Excel template, add your team, and map out the next two weeks of work. Here’s how to set it up.
Setting project schedule dates
Use the template to show who’s doing what over the next two weeks. Add the dates so nobody has to guess which Monday you mean.
Because the template covers two weeks, it works as a ready-made 2-week look-ahead. At the end of each week, clear the finished week and add the next one so the view keeps rolling forward.
Start by specifying the date ranges for Week 1 and Week 2 in the far left column.
Then, enter the date that corresponds to each weekday featured on the project schedule spreadsheet.
Adding project resources
Unless you’re working solo, you’ll have people helping you get the job done. List each team member or department who will contribute to the project in the Assigned to column.
Assigning project tasks
Now that you’ve added all your resources, you’re ready to assign work. Enter a descriptive name for the tasks you want each team member to accomplish below the corresponding day of the week.
Customizing your project schedule
Adding titles
Got lots of projects in the works? Keep your projects organized by giving each schedule its own specific title.
To add or edit the title of your project schedule template, double-click your cursor into cell A2.
Enter a new title for your project schedule template. Feel free to include the project name in your title so there’s no doubt about what this schedule covers.
Format the header text using the same formatting tools you’d use to format any other text in the worksheet.
Changing colors
Want your schedule to be easier to scan? Use different colors to organize tasks by team member, or apply your own brand colors to the template.
Click to highlight the cell, row, or column you want to change.
Go to Format > Cells, and select the Fill tab.
Click on the Background Color dropdown, and choose the new color you want to apply to the cell, row, or column you’ve highlighted.
Adding rows/columns
We’ve based this project timeline template on a two-week schedule that covers weekdays only. But you might want to expand your timeline to cover a month’s worth of tasks, weekends included. Or perhaps you’ve got a big crew to manage and need to add more people to your project schedule.
To insert a new row, click Insert > Rows. A new row will be added above the one you currently have selected, using the same formulas and formatting of the row above.
To insert a new column, go to Insert > Columns. A new column will be added to the left of the one you currently have selected, using the same formulas and formatting of the column to the left.
Removing rows/columns
Feel bogged down by extra details? Here’s how to remove rows and columns you don’t need.
To delete an existing row, click on the row you want to remove. Go to Edit > Delete, and choose Entire Row.
To delete an existing column, click on the column you want to remove. Go to Edit > Delete, and choose Entire Column.
Adding a company logo
You can swap in your own logo in two steps.
Right-click on the TeamGantt logo/header image in row 1, and select Change Picture.
Choose the image file you want to add to the worksheet, and click the Insert button.
Printing the project schedule
Need a copy for the wall or your next team meeting?
Start by setting the print area. Highlight all the cells you want to print out, then go to File > Print Area > Set Print Area.
If you want to adjust the scale of the project schedule to fit on a single page, go to File > Page Setup, and select the Page tab.
Once you’ve set the print area and adjusted the scale of your project schedule, you’re ready to send it to the printer. Click File > Print.
Make a project schedule in 5 minutes with TeamGantt
If you’d rather skip the spreadsheet, build your schedule in TeamGantt, where your team’s updates show up in real time and everyone sees the latest plan. Here’s how to set up your first schedule in TeamGantt.
Create a project. Name it, pick a start date, and choose how to begin: a blank project, one of our Gantt chart templates, a CSV or MPP import of the task list you already have, or AI.
Add task groups and tasks. Use groups for phases or teams, then add the tasks under each one.
Set dates. Drag a task bar to move it, or drag either end to change its duration.
Assign owners. Invite your team, assign each task, and check Workloads to see who’s overbooked before you share the schedule.
Link dependencies. Connect tasks that have to happen in order. When you drag a task to a new date, its dependent tasks move with it, so you can test a slip and see which milestones move.
Project scheduling alternatives: Excel vs. scheduling software
A spreadsheet works well for a short schedule that one person maintains, like the two-week view in our Excel template. But when one task slips, you’ll need to check which other tasks it affects and adjust those dates yourself.
Scheduling software makes those changes easier to manage. Task dependencies connect related dates, and a shared schedule gives your team one place to update progress and check what’s next. It’s worth considering when you’re juggling frequent changes or several people need to update the plan.
For a side-by-side look, see how TeamGantt compares to Microsoft Excel.
If a spreadsheet fits your project for now, try one of these templates: